|
V I V A Z I V A ! n e w s l e t t e r ▪volume number: 0902▪ F R E E P I C T U R E F R A M E D E S I G N ▪
Thanks so much for subscribing to the VIVA ZIVA! Newsletter. I’ll be issuing a newsletter every three months, with a new free design each time... exclusively created for the newsletter.
WHAT’S IN EACH VIVA ZIVA! NEWSLETTER?
NEW DESIGNS & UPDATES
NEW DESIGNS – MORRIS PIANO BENCH SEAT COVER
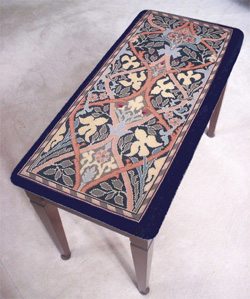
I’ve had such wonderful response with my TABRIZ piano bench seat cover, that I decided to create another one for the site! This exquisite design started as a small needlepoint area rug that I had already adapted from one of William Morris’ Hammersmith designs. Its graceful proportions and colours are perfectly suited to creating an elegant needlepoint tapestry for a standard size piano bench. Click here to have a look if you missed it!
UPDATES FROM THE LAST NEWSLETTER
1.GO SHOPPING WITH ZIVA !
Since the last newsletter, I’ve finished adding the shopping pages for all the current ZIVA needlepoint designs!
On these pages, you’ll find:
For more detail, you can go to our Terms and Conditions page to learn more about the services we offer.
2. Small Cases Added
In the last newsletter, I gave you a sampling of my new cell phone case and change purse designs. I hope you'll check them out! They’re ideal small projects for beginners: the designs aren’t overly complicated.
YOUR STITCH TO TRY
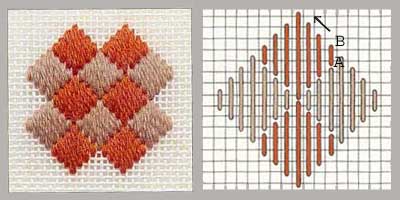
I’ve chosen the 2-4-6-8 stitch for Your Stitch to Try this time.
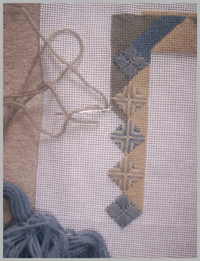
I love the name of this stitch! It basically tells you how to do it just by its name! It consists of large diamond shapes formed by working vertical stitches over 2,4,6,8,6,4, and 2 threads of canvas. (see left photo below)
I love its Art Deco look!
Now it’s time to try it as I designed it for the DECO Diamonds picture frame… this newsletter’s free design. 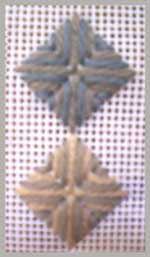
PRACTICE FIRST! The photo at right is what you want this new stitch to look like when you’ve finished practicing it. Don’t worry what colours you use at this stage, but make sure you alternate the colours in each small diamond, so you can see the effect.
Keep practicing until you feel confident that you’ve got it! Then you are ready to stitch the free design!
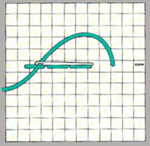
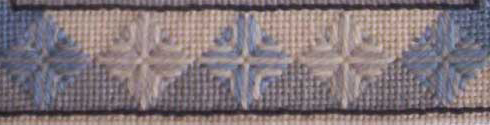
Another stitch to learn! I added a thin black line to the picture frame design to give it a more Deco look. It also goes well with the black metallic frame I wanted to use. This effect can be created with a stitch known as the Back stitch, which you do after you’ve finished stitching the picture frame. It’s strictly optional. If you like it, practice it by following the diagram at right stitching over two threads to create a straight stitched line. As the name implies, you stitch back on yourself, to finish the stitch, and then come up two threads ahead to create the next stitch (see diagram)
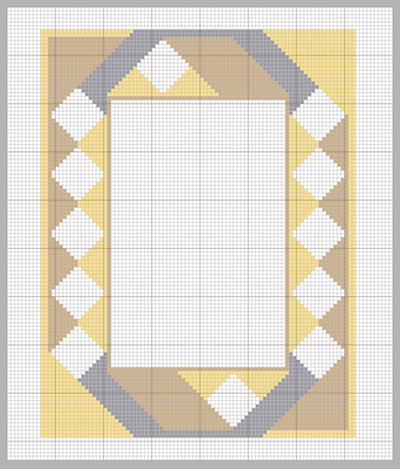
FREE DESIGN ‘DECO DIAMONDS’ PICTURE FRAME DESIGN 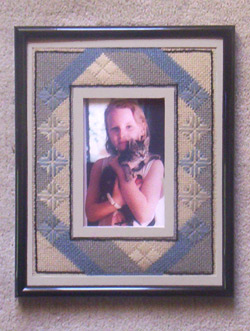
This subtle picture frame design with its neutral-coloured textures, serves as soft background to your favourite family photos. As a background, it doesn’t distract from your photo, yet has interesting depth, which the texture provides. The 2-4-6-8 Stitch is the ideal stitch to give the subtle textures I was looking for.
The rest of the picture frame is stitched in the Basketweave Tentstitch.
The 45° angles of the 2-4-6-8 stitch, and the Basketweave Stitch, create geometric shapes reminiscent of the chevron designs from the 1930’s… so the name ‘DECO DIAMONDS!”
The size of the finished needlepoint picture frame is approx. 7” x 8 ½” (17.5 x 21.5 cm)… which will take photos up to 3 ½” x 5” (9 x 12.5 cm) Because the picture frame design is symmetrical, it will work with both horizontal and vertical photographs.
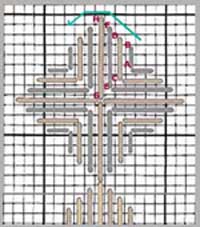
COLOURED CHARTS
I’m including two coloured charts for your reference at different gauges, so you’ll have no trouble getting the canvas in your area. The colours for this tapestry are very soft and delicate. However, for visual clarity when stitching, the colours are shown much stronger on charts.
Please note: the back stitch, which is optional, is shown on the 12 gauge chart and not on the 13 gauge, so you can see the difference.
This first chart above is for canvas at 12 holes per inch
This second one above is for canvas at 13 holes per inch.
YARN COLOURS
All the wool yarn colours as stitched are from the Appleton Tapestry Colour Range, which are readily available at your local needlepoint shop or online. The codes shown on the 12 gauge Coloured chart refer to the yarn colours listed below. You will need one hank of each of the colours. I’m including DMC Laine Colbert wool yarn colours as well, if you have problem finding Appleton. They’re as close as possible to the Appleton colours.
Colours as stitched: APPLETON TAPESTRY WOOL YARNS
OR
DMC LAINE COLBERT WOOL YARNS
OTHER MATERIALS
You will also need :
approx. 10” x 12” (approx. 25 x 30 cm ) Note: Interlock canvas is recommended in order to trim the canvas for framing without any risk of it unravelling. (See Making Up section below.)
Go to the ZIVA site for more detail info on the materials required.
STARTING UP
As usual, start by putting masking tape on the canvas edges to protect the yarns from getting frayed.
Then please study the above photo and note the following:
STITCHING IN PROGRESS
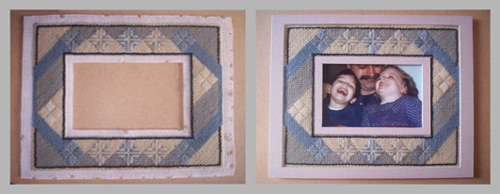
FINISHING
The metallic picture frame that I purchased to frame the needlepoint and my favourite family photo is approx. 8” x 10” (20 x 25 cm). You could go larger if you wish (but not smaller). The first thing I had to do was prepare the other materials. The above photo composite shows you the next steps.
GREAT TIPS! For a softer look, leave off the black backstitch and use a gold or brass frame. This would work well in a more traditional setting. For a more contemporary look, why not use a clear acrylic box picture frame? There are several sources online, to fit the dimensions of the ‘Deco Diamonds’ Picture Frame. Use your imagination and make it your own creation! Send me a photo of what you’ve done. I’d love to see it and put it on the site!
ASK THE ZIVA DIVA !
That’s still me! With my interior designer hat on this time! QUESTION: My husband and I have inherited a lot of traditional furniture from his family. Most of the pieces are beautiful, but I would really like our home to look more contemporary, and show our taste as well. What can we do? Thanks, Claudia First of all, please send me a few photos of some of the pieces, and the rooms they’re in, and I can help you personally.
But I thought I’d include this question in this newsletter, because it’s a common situation. 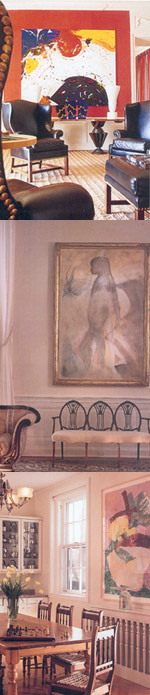
So here are some general tips that could help anyone with this interior design dilemma. I’m also including some photos at right, which illustrate how you could approach the décor of your home. PATTERN COLOUR
PAINTINGS AND SCULPTURE
I hope this gives you a taste of what is possible!
WHAT NEXT? New designs in the works! Over the winter months (2009-2010)I’ll be developing needlepoint designs from handbag patterns which are readily available on the internet. I’m still working on new belt and seat cover designs! And some new cushion designs!The next VIVA ZIVA! Newsletter #0904 will be issued in January 2010 . I’ll be including: I’ll be including: Please contact me if there is a particular stitch you’d like me to use for a free design in a future newsletter! Share this newsletter with friends and relatives. Looking forward to sending you the next newsletter! Best wishes, Sylvia McLeod |