|
V I V A Z I V A ! n e w s l e t t e r ▪volume number: 1005▪ FREE NAPKIN RING DESIGN N° 2 ▪
Thanks so much for subscribing to the VIVA ZIVA! Newsletter. I’ll be issuing a newsletter every three months, with a new free design each time... exclusively created for the newsletter. This time the free design is a classic napkin ring that will suit that special dinner party when you decide to go all out!
WHAT’S IN EACH VIVA ZIVA! NEWSLETTER?
NEW DESIGNS & UPDATES
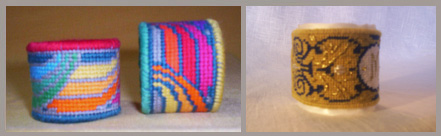
NEW DESIGNS – BRACELETS
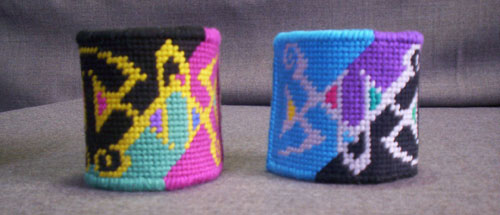
These stylish needlepoint bracelets are easy to stitch and fun to wear! The above photo shows you our two ‘FUNKY’ bracelet designs. CLICK HERE to see the whole range of these contemporary designs.Whether your taste is funky, refined or even whimsical, there is one just for you! Chic cuff bracelets with lots of flair …perfect for any occasion! And they're also easy to make up …. minimum sewing required!
YOUR STITCH TO TRY
I’ve included two stitches that I think are very important for any serious stitcher to learn… they are the French Knot and the Stem Stitch.
They are not difficult to do, and they give your finished tapestry wonderful detail and depth. CLICK HERE to see how these decorative stitches add the final touch to my small purses designs.
First try……. THE FRENCH KNOT 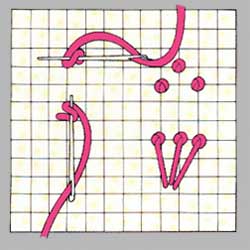
Now try next……. THE STEM STITCH 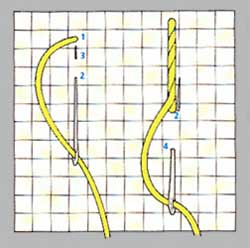
PRACTICE FIRST! The photo at right is what you want these decorative stitches to look like when you’ve finished practicing them. Don’t worry what yarn you use at this stage, but you should practice with metallic thread at some point before you start these finishing decorative stitches. Keep practicing until you feel confident that you’ve got it! Then you are ready to stitch the free design!
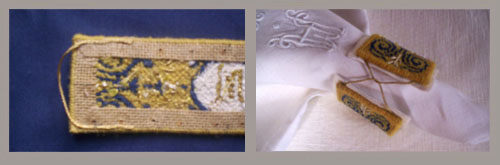
FREE DESIGN ‘CAMILLE’ NAPKIN RING DESIGN
INSPIRATION FROM 19TH CENTURY FRANCE!
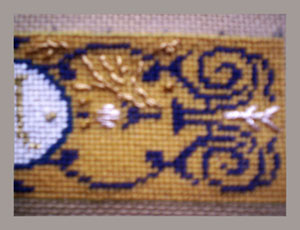
This elegant design was inspired by 19th century needlepoint tapestries and embroidered linen I see in antique and second-hand shops during the 15 years of my living in France. Many women in France today still have a passion for stitching these time-honoured designs. I wanted the napkin ring design to reflect the elegance and delicacy of tapestry designs prevalent from this period.
So I created this traditional napkin ring in regal colours of gold and royal blue… accented with silver and gold metallic threads. An elegant final touch to an elegant dinner setting! Please click here if you want more background about this napkin ring design.
What is the initial you want for the centre medallion? If you’re a subscriber to the VIVA ZIVA! newsletter, contact me and I’ll send you a free chart with your initial!
The entire napkin ring is stitched in the Basketweave Tent stitch, including the centre initial in gold thread. As mentioned above, the FRENCH KNOTS and STEM STITCH are done after you’ve finished the basketweave stitch.
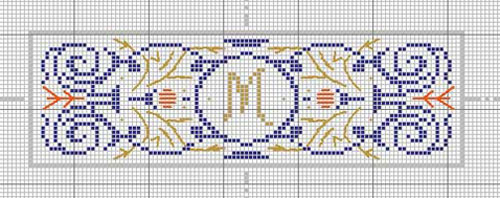
COLOURED CHART
To retain the delicacy of the design , I chose an 18 mesh gauge canvas (18 holes per inch) so that the traditional detail would not be lost.
Reading the Chart:
YARN COLOURS
All the wool yarn colours as stitched are from the 2 ply APPLETON CREWEL WOOL Colour Range.
The remaining yarns, metallic and satin cotton, are from DMC.
All are readily available at your local needlepoint shop or online.
To make 6 napkin rings as stitched, you will need the following colours and quantities:
APPLETON CREWEL WOOL YARN
DMC YARNS
OTHER MATERIALS
You will also need :
approx. 10.5” x 16” (approx. 26 x 41 cm ) to make up 6 napkin rings. Note: Interlock canvas is recommended in order to trim the canvas without any risk of it unravelling. (See Making Up section below.)
Go to the ZIVA site for more detail info on the MATERIALS required.
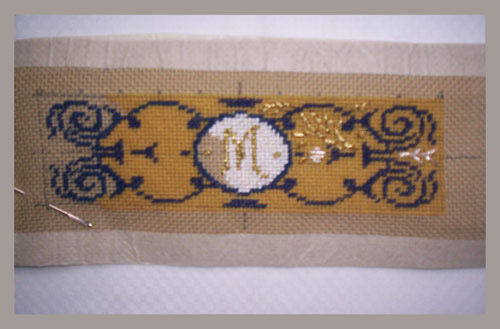
STARTING UP /STITCHING IN PROGRESS
TIPS FOR WORKING WITH SPECIAL YARNS
Embroidery yarns
For the central medallion, I worked with a very fine embroidery thread, because I wanted its satin sheen to complement the metallic thread and contrast with the mat finish of the wool. I put three strands of the thread on the same needle, and stitched the white medallion in the centre in a basketweave stitch.
Metallic yarns
I separated the gold and silver threads into individual strands, and used:
TIP: Metallic yarn can be a bit coarse, so keep the thread shorter than you would with normal yarn, so you won’t be pulling it too much.
FINISHING
=========
FINISHING TIPS:
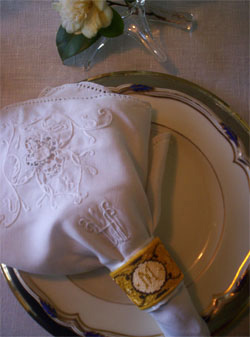
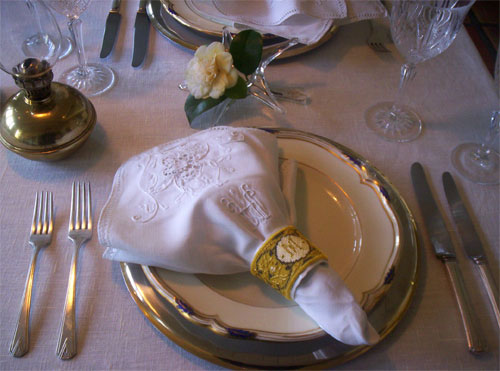
Your table is set for a very elegant and chic dinner party! Now all you have to do is figure out the menu! Bon appétit encore!
ASK THE ZIVA DIVA !
C’est encore moi! I want to try to design a needlepoint seat cover similar to the one that my mother stitched years ago. I’m having trouble figuring out what canvas mesh would be right for it. Could you help me? Thank you, from Beryl, Leeds UK. P.S. Love your designs!
Dear Beryl,
Thanks for you kind words. I picked your email because it seems like several people who have written in have the same problem.
First of all, if you’re going to make a seat cover, the best canvas, no matter the gauge or mesh size, is evenweave canvas. Because it’s woven, it will ‘give’ a bit when you sit on it, which is what you want. CANVAS MESH
With canvas mesh, the higher the number, the more holes per inch... for example, 32 holes per inch for extremely fine work, such as ‘petit point’, to as few as 3 or 5 holes per inch, which is used mainly for rug making. Depending on the detail of your design, 10-12- or 14-mesh are the most frequently-used meshes for cushions, chair pads and seat covers. The more traditional designs from the 18th and 19th century are at least 18 gauge mesh. This allows you to create a lot more detail. You could also use Penelope canvas which is a double gauge canvas… excellent for creating fine detail if required in the centre of the seat cover design, and a larger stitch for the surrounding background. CLICK HERE to review more canvas mesh information including diagrams of each type, which should help you further.
The above photos should also help. They are a good example of how to combine the best canvas mesh with the design. The photo above left shows the ’Like a Rainbow’ napkin rings from newsletter #1004. It was stitched at 12 gauge, because it’s a fairly simple graphic design. Compare it to this newsletter’s napkin ring ‘Camille’, which was stitched at 18 mesh to ensure the detail was not lost and to reinforce the delicacy of the design.. What a contrast! Good luck with your project, Beryl! WHAT NEXT? New cushion designs coming! I can happily report that my cushion designs are in great demand! So I’ve decided to add more! There will be more Art Nouveau designs and a new section for Abstract Cushion designs. I hope you’ll like them! The next VIVA ZIVA! Newsletter #1006 will be issued in July 2010 . I’ll be including:
Please contact me if there is a particular stitch you’d like me to use for a free design in a future newsletter! Share this newsletter with friends and relatives. Looking forward to sending you the next newsletter! Sylvia McLeod |