| Back to Back Issues Page |
 |
|
VIVA ZIVA ! newsletter:; Volume # 1004: FREE NAPKIN RING DESIGN N° 1 January 30, 2010 |
V I V A Z I V A ! n e w s l e t t e r ▪volume number: 1004▪ FREE NAPKIN RING DESIGN N° 1 ▪ HAPPY NEW YEAR! BONNE ANNEE ! Thanks so much for subscribing to the VIVA ZIVA! Newsletter. I’ll be issuing a newsletter every three months, with a new free design each time... exclusively created for the newsletter.
This time the free design is a colourful napkin ring that will go with all your napkin colours for a festive, casual lunch or brunch!
WHAT’S IN EACH VIVA ZIVA! NEWSLETTER?
NEW DESIGNS & UPDATES
NEW DESIGNS – ANATOLIA TEA COSIES

Tea cosies with exotic flair… inspired by the vivid colours and patterns of Persian carpets. The tea cosy design at right exhibits the traditional carpet colours from Anatolia (now Turkey).
A second colour scheme, more contemporary in nature, gives the design a totally different look!
Their striking colours blend well in today's modern or traditional interiors. CLICK HERE to see both these elegant Persian tea cosy designs.
NEW DESIGNS – CLUTCH BAGS

Add that final elegant touch to your basic cocktail dress or evening wear by stitching one of these new CLUTCH BAG designs! ZIVA’s first new designs for 2010! Our model on the right is wearing the Chrysler Coupé Clutch Bag … a dynamic design of neutral grey and wheat colours with teal green and cranberry red accents. CLICK HERE to see more of these new clutch bag designs.
UPDATES FROM THE LAST NEWSLETTER
In the last newsletter, I promised two napkin ring designs for this newsletter, “one traditional, and one more contemporary… to suit any dinner or lunch party”.
But, once I started working on the designs, I realized that there would be too much information and too many new stitches for one newsletter! So I decided to split the free napkin ring designs into two newsletters: 
FINISHING THE EDGES OF YOUR TAPESTRY
I’ve had so many questions from visitors to this site about finishing the edges of their particular tapestry. After all your hard work stitching, you certainly don’t want the finished piece to look amateur because of the making up. I also want you to be happy with the final result after purchasing one of my hand-painted designs! You will find a dedicated section ‘How to Finish: Sewing Needlepoint’ on the ZIVA website just for discussing how to finish different types of tapestries, including:
Please click here to go to ‘Sewing Needlepoint’, and hopefully you will get a better insight on finishing your labour of love!
If none of the above ideas help you, please contact me if you’re looking for other ideas for finishing your project. YOUR STITCH TO TRY
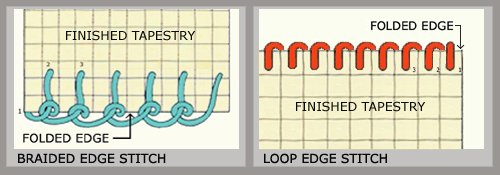
I’ve chosen 2 edge stitches for Your Stitch to Try this time. They work well for protecting the edges of any needlepoint tapestry.
The first one is called ‘Braided Edge Stitch’ (left photo below). The diagram clearly shows how to make this edge stitch.
The second one I call the ‘Loop Edge Stitch’ (right photo below), which is the stitch I used for edging the ‘Like a Rainbow’ napkin rings.
I prefer this edge stitch because it creates a smoother result.
Note:These stitches can, of course, work anywhere where the edges of your finished pieces are going to be left exposed.
They’re done after you’ve blocked your piece and have trimmed the excess canvas, leaving enough (approx ½ “or 1.25 cm) to fold the spare canvas back and be ‘caught’ by the edge stitch.
With the Loop Edge stitch;
TIPS:
Now it’s time to try it for the Like a Rainbow napkin ring… this newsletter’s free design. 
PRACTICE FIRST! The photo at right is what you want this loop edge stitch to look like when you’ve finished practicing it. Don’t worry what colours you use at this stage, but use cotton yarn to get a feel for the final effect. Keep practicing until you feel confident that you’ve got it! Then you are ready to stitch the free design!
FREE DESIGN ‘LIKE A RAINBOW’ NAPKIN RING DESIGN
These festive napkin rings add the finishing touch to your table for an informal lunch or brunch with friends! With this vibrant design in a rainbow of bright cotton colours, you can rotate the colours anywhere you want to match the napkin colours you have!
Or you may want to do just one range of colours and repeat the colours around the entire napkin ring. Your choice. Please click here if you want more background about this napkin ring design.
The entire napkin ring is stitched in the Basketweave Tent stitch. As mentioned above, the Loop Edge Stitch is done after you’ve blocked your tapestry and trimmed the excess canvas.
COLOURED CHARTS
I’m including two coloured charts for your reference at different gauges, so you’ll have no trouble getting the canvas in your area. NOTE: Both charts show the colour distribution of the pattern only. The background in these charts is dark teal blue, with the mid-grey colour as part of the detail.
If you use the mid-grey for the background, the dark teal blue would be used on the detail. See coloured photos.
This first chart above is for canvas at 12 holes per inch
This second one above is for canvas at 13 holes per inch.
YARN COLOURS
All the COTTON yarn colours as stitched are from the DMC SOFT COTTON Colour Range, which are readily available at your local needlepoint shop or online. To make 3 napkin rings with the dark teal background and 3 napkin rings with the mid-grey background, you will need three skeins of each of the following colours from DMC SOFT COTTON :
Colours as stitched: Colour Groupings from top to bottom of Pattern:
Background Colours : Loop Edge Stitch Colours :
OTHER MATERIALS
You will also need :
Go to the ZIVA site for more detail info on the MATERIALS required.
STARTING UP /STITCHING IN PROGRESS
DESIGN SUGGESTIONS
To complement the colours of your napkins or the colour scheme of your dining room, you could stitch the same pattern all in one colour or in a range of blues, for example. Use your imagination and make it your own creation!
Send me a photo of what you’ve done. I’d love to see it and put it on the site!
FINISHING
TIPS:

Your vibrant napkin rings are now ready to use at your next informal lunch! Bon appétit!
ASK THE ZIVA DIVA !
C’est moi! I’ve subscribed to your newsletters from the first one, and love the bracelet I made from your design. I find the charts easy to follow. I know your designs on your site are hand-painted, but would you offer charts for your designs as well? Thanks, Carly from Vancouver, Canada
Dear Carly,
It’s an idea I’ve been considering for awhile.
I personally find charts rather soul-destroying, having to count every stitch, particularly with the larger tapestries. I prefer to follow the design printed or hand-painted on the canvas. After all, it’s supposed to be fun!
But with the smaller items, such as bracelets, cell phone cases, small purses, etc. charts would be just as easy to follow, and just as enjoyable to make.
With today’s computer technology, it would be easy for you to download the design in chart form, complete with the instructions and a list of yarn colours and quantities.
So there is a strong possibility that I will be announcing this feature for the smaller designs on the site in the next few months. Thanks for your suggestion and encouragement!
WHAT NEXT? New designs in the works! Before spring 2010 you will see a new section on the site for the NEW ZIVA bracelet designs! The next VIVA ZIVA! Newsletter #1005 will be issued in April 2010 . I’ll be including: Please contact me if there is a particular stitch you’d like me to use for a free design in a future newsletter! Share this newsletter with friends and relatives. Looking forward to sending you the next newsletter! Happy New Year, Sylvia McLeod |
| Back to Back Issues Page |