|
V I V A Z I V A ! n e w s l e t t e r ▪volume number: 1007▪ FREE TABLE RUNNER BORDER DESIGN ▪
Thanks so much for subscribing to the VIVA ZIVA! Newsletter.
I’ll be issuing a newsletter every three months, with a new free design each time... exclusively created for the newsletter.
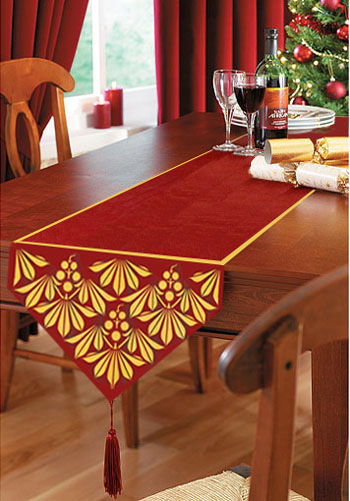
Stitch this elegant free ART NOUVEAU design ‘MISTLETOE’ TABLE RUNNER BORDER ready to decorate your home for the holiday season!
WHAT’S IN EACH VIVA ZIVA! NEWSLETTER?
- New Designs & Updates
- Your Stitch to Try
- FREE Design
- Ask the ZIVA DIVA!
- Next Issue
NEW DESIGNS & UPDATES
NEW TABLE RUNNER DESIGNS !
This newsletter is dedicated to needlepoint table runners!
While developing a design for this newsletter, I came up with several other ideas for table runners!
The one at right is called‘Golden Chestnuts’, perfect to stitch for the holiday season.
There are also other motifs to fit your holiday décor…. from pine cones to holly.
I’ve adapted some of the designs to suit the rest of the year as well.
Click on TABLE RUNNERS to choose one for that special occasion!
SITE UPDATE
ZIVA SITESEARCH and ZIVA FRANÇAIS
ZIVA SiteSearch
The Ziva Needlepoint Design site is growing all the time with new designs and features!
To make it easier to find what you’re looking for, I’ve added the ZIVA Site Search page.
You’ll be able to click on it at the top of the side bar on any page on the site. Once on the page, type in your search, and voila! It’s there to click on.
Can’t be easier! Have a look and try it! Click on ZIVA SITESEARCH
ZIVA FRANÇAIS 
CONTACTEZ-NOUS CHEZ ZIVA!
Que vous soyez novice de la tapisserie à l’aiguille ou que vous en faites depuis longtemps…n’hésitez pas à me contacter.
Je serais ravie de recevoir vos mails ou courriers !
Veuillez noter que toutes les instructions de mes kits sont disponibles en français.
YOUR STITCH TO TRY
THE GOBELIN STITCH
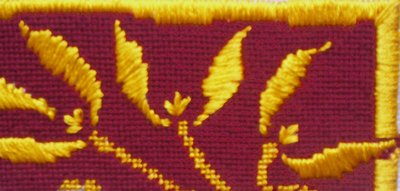
The Gobelin Stitch is perfect for creating a shimmering Mistletoe table runner border as the finishing touch to your holiday decorations!
It derives its name from the exquisite tapestries produced exclusively for the Kings of France at the Gobelin Factory in Paris for hundreds of years.
They produced magnificent and luxurious wall hangings, upholstery, and furniture in a richly ornate style.
The photo above shows the sumptuous effect created by the Gobelin’s long satiny stitches!

TWO TYPES OF GOBELIN STITCHES TO TRY
Straight Gobelin
- Work the stitch by bringing the needle up at A, down at B: then up at C and down at D etc.
- Follow the diagram for the mitred-corner detail. Work a long stitch over where the stitches merge, diagonally from the inside corner to the outside point of the corner to finish it neatly.
- The Straight Gobelin is used on the border of the Mistletoe Table Runner Border
Sloping Gobelin
- As the name suggests, you stitch the Gobelin Stitch the same way as above, but work it diagonally over 2 or 3 thread intersections.
- The Sloping Gobelin Stitch is used on the leaves of the Mistletoe motif.
- Try to maintain the same slant for the entire leaf.
- However, as each leaf is angled differently, you should try to change the slant of the stitch on the next leaf.
- Study the photo at right and the practice as shown in the photo below.
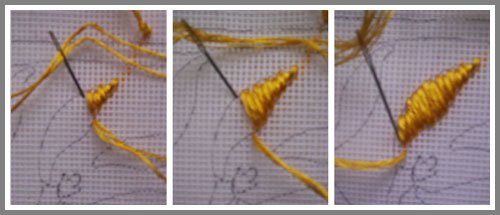
PRACTICE FIRST!
The photos above show what you want the sloping gobelin stitch to look like as you’re practicing it.
Draw a leaf shape on the 13 mesh canvas with a waterproof pen. (The photos above show the leaves drawn for the actual stitching of the table runner border.)
Follow the leaf shape with the sloping stitch as shown, using any cotton embroidery yarn, just for practice. Keep the same slope throughout one leaf, as much as possible.
Note: For the actual tapestry, I doubled up the satin thread to make sure that the canvas would be covered. Also, this double thickness adds a wonderful depth to the final tapestry.
Keep practicing until you feel confident that you’ve got it! Then you are ready to stitch the free design.
FREE DESIGN
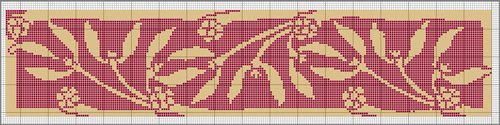
‘MISTLETOE’ TABLE RUNNER BORDER DESIGN

You could stitch the ’MISTLETOE’ border design as shown in the photo at right to make up an end border of approx. 17.5” (44 cm). This is the size I’ve included for the quantities of yarn and canvas below.
But you could make it longer!
With a design repeat of approx. 12” (30cm), you can create a border the full length of your table runner to suit the dimensions
of your table.
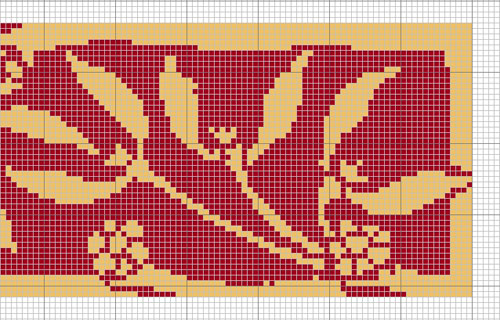
COLOURED CHARTS
I stitched the design on a 13 mesh gauge canvas (13 holes per inch) which reinforces the delicacy of the design. Reading the Charts:
- You will be best to draw the leaves on the canvas using the chart below to count the threads.(Use a waterproof marker) This will make it much easier to follow the shapes of the leaves, and concentrate on the Gobelin stitch itself.
- Only the outside border and the leaves are in the Gobelin Stitch.
- The rest of the design is stitched in the Tent Basketweave stitch.
- Note that the border is uneven on the inside edge. You may want to draw the border pattern on the canvas as well.
- The first two charts below overlap to create the repeat in the design. You can repeat it as long as you need!
- The bottom chart shows the pattern repeat as stitched at 17.5"

YARN COLOURS
The satin yarn is from the DMC Satin Floss range of colours.
The wool yarn colour as stitched is from the 4 ply APPLETON TAPESTRY WOOL Colour Range.
All are readily available at your local needlepoint shop or online.
To make one end border at 17.5" (44 cm), of the table runner, using the Gobelin Stitch and tent stitch as shown, you will need the following colours and quantities:
NOTE: Double the following quantities to make up two end borders.
- DMC #S3820 Satin Gold ● 10 skeins
- APPLETON TAPESTRY WOOL YARN # 505 Scarlet ● 1 hank
For a brighter red background, still in wool, use # 504 Scarlet from Appleton.
For a red background with a satin finish, use DMC S321 or S606
OTHER MATERIALS
You will also need :
- mono interlock canvas at 13 gauge,
approx. 8.5” x 20” (approx.) to make up one end of the table runner border.
Note: Interlock canvas is recommended in order to trim the canvas without any risk of it unravelling.
- Needlepoint Needle: For 13-mesh canvas, use size 20 needle
- Masking Tape
- Scissors
- Velcro (see finishing tips below)
- Waterproof marker
Go to the ZIVA site for more detail info on the MATERIALS required.
STARTING UP /STITCHING IN PROGRESS
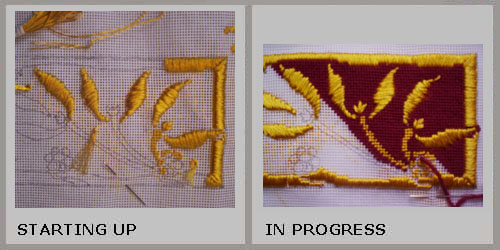
- As usual, start by putting masking tape on the canvas edges to protect the yarns from getting frayed.
- Determine and mark (with a waterproof marker) the centre lines of the canvas in order to place the design approximately in the middle of the canvas.
- As mentioned above, to make your stitching easier and more pleasurable, mark the leaves (and the border if you wish) with a waterproof marker, following the graphic chart.
- Always stitch the detail design first ,then fill in the background colours. (See photo above.)
TIPS ABOUT SATIN YARN
- The satin yarn is usually used for embroidery, so in order to cover the needlepoint canvas with the gobelin stitch, you have to double up the yarn on your needle. This applies to the border and the mistletoe leaves only.
- Only a single satin yarn is needed for the basketweave stitch on the mistletoe branches and berries.
FINISHING TIPS
I suggest that the best way to make up the tapestry border is to make sure it can be removed from the actual fabric table runner.
By means of applying a Velcro strip to the back of the tapestry, the needlepoint tapestry can be removed before the fabric is washed or dry-cleaned.
I covered more tips for the finishing of table runners on the site. Please refer to the table runners page for more ideas on finishing. Click on Table Runners
ASK THE ZIVA DIVA !
Encore moi!
QUESTION: I’m having trouble finding the prices for your handbags. Could you please tell me where they are? There’s one I’m dying to stitch! Thanks, Jessica, U.K.
Dear Jessica,
Don’t worry, it’s easy!
As you’ve probably noticed, I’ve grouped my designs on the site under two categories:
ZIVA CASA - for needlepoint designs for your home
ZIVA VOGUE – for needlepoint designs for you to wear
At the bottom of each page of a tapestry design, you will see a sentence “GO Shopping for-----“. Click on it, and it will take you directly to the shopping item you’re looking for!
I’ve included a picture of each item, size(s) available, and prices.
In your case, click on “Go Shopping for Handbags and Clutch Bag Designs with Ziva” at the bottom of the handbags and purses page your item is on.
If you’re still having trouble, contact me again.
I’m looking forward to painting the design you’ve chosen!
Thanks, Jessica, for your interest in ZIVA!
WHAT NEXT?
NEW SEAT COVER DESIGNS
Thanks for keeping me busy developing custom designs for seat covers and piano benches!
I’ve also started working on some new seat cover designs, including chairs and footstools, which I’ll be showing you over this winter!
NEW HANDBAG DESIGNS
New handbag designs still coming!
I’m still designing and stitching new handbags that will be easy to make up for those of you who also like to sew!
As mentioned last time, I’ve chosen an easy pattern to follow from a well-known pattern manufacturer.
Starting soon, I’ll introduce them to the site, as I get them finished.
I hope you like them!
The next VIVA ZIVA! Newsletter #1108 will be issued in January 2011 .
I’ll be including:
- New Designs & Updates
- A new Stitch to Try with a
- Free needlepoint design for a dynamic pendant necklace … perfect to stitch for a fun evening out!
- And lots of other features!
Please contact me if there is a particular stitch you’d like me to use for a free design in a future newsletter!
Share this newsletter with friends and relatives.
They can also go to my subscription page on the site to get on the mailing list for the next VIVA ZIVA! Newsletter
Looking forward to sending you the next newsletter!
Sylvia McLeod
|

