|
V I V A Z I V A ! n e w s l e t t e r ▪volume number: 1006▪ FREE TOTE BAG DESIGN ▪
Thanks so much for subscribing to the VIVA ZIVA! Newsletter. I’ll be issuing a newsletter every three months, with a new free design each time... exclusively created for the newsletter.
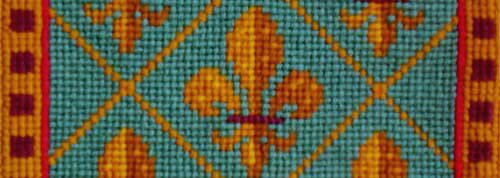
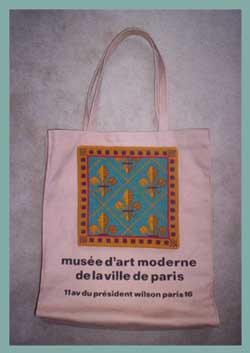
Stitch this funky free design ‘FLEUR-DE-LIS’ TOTE BAG ready to wear for this fall!
WHAT’S IN EACH VIVA ZIVA! NEWSLETTER?
NEW DESIGNS & UPDATES 14 NEW CUSHION DESIGNS ! 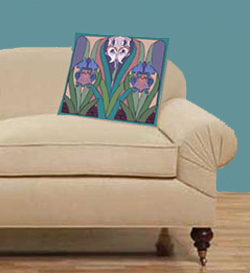
SIX MORE ART NOUVEAU CUSHION DESIGNS! I had a great response from you when I originally introduced my Art Nouveau cushion designs to the ZIVA Collection. So I’ve created more to pique your interest! CLICK HERE to see these elegant designs that will work well in so many rooms of your home! 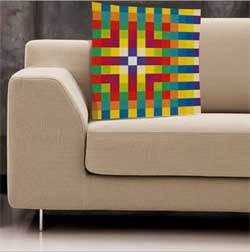
EIGHT NEW ABSTRACT CUSHION DESIGNS! Have a look at these large bold cushion designs inspired by the Bauhaus, Mackintosh, Matisse and Morris Louis…design/art icons from the 20th century! CLICK HERE to see these new designs which will add a dramatic accent to your home! SITE UPDATE- ZIVA NEEDLEPOINT KITS Many of you have asked me what’s in the ZIVA Needlepoint kits that I paint and assemble for you. So I added a page to help you see and understand exactly what you’ll receive when you order one of my kits. CLICK HERE for What’s in Ziva Needlepoint Kits
YOUR STITCH TO TRY THE CROSS STITCH
The Cross Stitch is normally associated with embroidery, but takes on a bolder appearance with needlepoint. The stitch can be used to outline an area or as a narrow border; it can also be a feature in itself used to create a bold squared- effect …perfect for developing graphic designs where clean straight corners are desired.
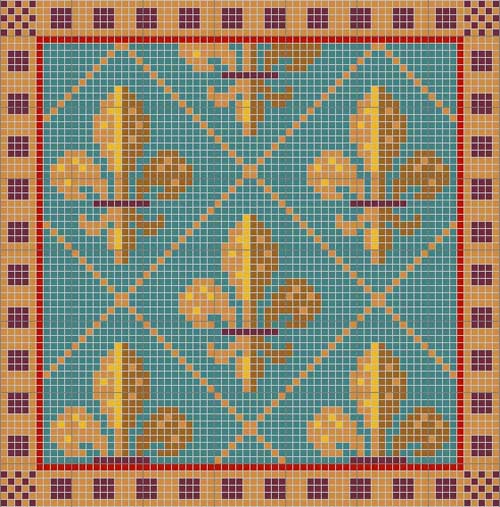
So I created a several borders for this fleur-de-lis design (see above) with a series of squares…ideal for showing you the cross stitch with its simple, bold lines. I also used the same stitch to create the diagonal lines between the fleur-de-lis motif to make it ‘stand out’ visually from the tent stitch in the background.
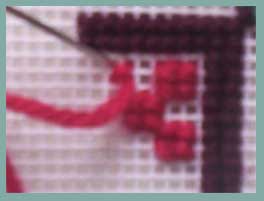
PRACTICE FIRST! The photo at right is what you want the cross stitch to look like when you’ve finished practicing it. Don’t worry what colour yarn you use at this stage, but you should practice with 4 ply wool tapestry yarn on a 10 gauge canvas at some point before you start. Keep practicing until you feel confident that you’ve got it! Then you are ready to stitch the free design.
FREE DESIGN ‘FLEUR DE LIS’ TOTE BAG DESIGN
You could stitch the ’FLEUR-DE-LIS’ tapestry in the smaller size (photo above left) to create a square of approximately 7” (18 cm) .It has a cross-stitch border of wine-red squares in a gold background.
Or you could add two more cross-stitch borders, one in red and one in turquoise (the latter also with wine-red squares) to create a tapestry panel of approximately 12” square (30 cm)(photo above right).
The size is completely up to you! For example, you could add just the red border for a tapestry square of approximately 9.5” (24 cm). Or add/repeat more borders! Why not?
COLOURED CHARTS
To reinforce the boldness of the design, I chose a 10 mesh gauge canvas (10 holes per inch). Reading the Charts:
YARN COLOURS
All the wool yarn colours as stitched are from the 4 ply APPLETON TAPESTRY WOOL Colour Range. < All are readily available at your local needlepoint shop or online.
To make largest tote bag, in cross stitch and tent stitch as shown, you will need the following colours and quantities:
APPLETON TAPESTRY WOOL YARN
Colours as shown:
OTHER MATERIALS
You will also need :
approx. 18” square (approx. 46 cm square) to make up the large tote bag. Note: Interlock canvas is recommended in order to trim the canvas without any risk of it unravelling.
Go to the ZIVA site for more detail info on the MATERIALS required.
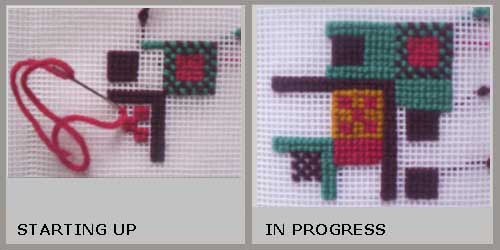
STARTING UP /STITCHING IN PROGRESS
FINISHING TIPS
OTHER FINISHING IDEAS! You can fold the small Fleur-de-Lis tapestry and make up a stunning eye glasses case! Or you could take the larger Fleur-de-Lis tapestry and make up a cushionwith it! Great Choices!
ASK THE ZIVA DIVA !
Who else but me!
QUESTION: How do I determine the amount of tapestry yarn I require ? Diane from Texas
Dear Diane,
A tricky question, and asked all the time! First calculate the total area of your intended finished design. Simply do this by multiplying the desired width by the desired length to create the total square inches. Divide the figure by 36. This gives you the number of hanks of wool that you will need. On average, a hank covers an area 6 inches by 6 inches or 36 sq inches, with a standard tent stitch. So using 36 sq inches a hank is a pretty good estimate. It’s certainly not an exact science, but generally it works for me.
For a design with several colours, I usually estimate what the percentage of the tapestry that colour takes up as compared to the total number of hanks. That will help you determine how many hanks per colour are required. Because each person varies in their use of wool, and if you do a lot of stitching, you should always calculate out your own consumption as you work, so you can develop your own rule of thumb. Click here for more help on choosing and working with the right needlepoint yarn.
I hope that helps you, Diane. And thanks for subscribing to my VIVA ZIVA! Newsletter.
WHAT NEXT? New handbag designs coming in the fall! I’m presently designing and stitching new handbags that will be easy to make up for those of you who also like to sew! I’ve chosen an easy pattern from a well-known pattern supplier and have developed 4 new designs. Starting in the fall, I’ll introduce them to the site, as I get them finished. I hope you like them! The next VIVA ZIVA! Newsletter #1007 will be issued in October 2010 . I’ll be including:
Please contact me if there is a particular stitch you’d like me to use for a free design in a future newsletter! Share this newsletter with friends and relatives. Looking forward to sending you the next newsletter! Sylvia McLeod
|