| Back to Back Issues Page |
 |
|
VIVA ZIVA ! newsletter: Volume # 1313: FREE 'OP ART' CUSHION DESIGN April 30, 2013 |
V I V A Z I V A ! n e w s l e t t e r ▪volume number: 1313 ▪ FREE 'OP ART' CUSHION DESIGN ▪
Thanks so much for subscribing to the VIVA ZIVA! Newsletter. We’ll be issuing a newsletter regularly, with a new free design each time... exclusively created for this newsletter.
NEW DESIGNS JUST RELEASED! We’ve just finished creating the ZIVA CARPET COLLECTION and the ZIVA NEEDLEPOINT ART COLLECTION for those of you who have asked us for larger projects to work on! 
Learn the Brick Stitch, and stitch this RETRO OP ART design, ‘SIXTIES ILLUSIONS” , to create a funky cushion. Repeat the pattern and you can make it the size you want! WHAT’S IN EACH VIVA ZIVA! NEWSLETTER?
NEW DESIGNS & UPDATES ZIVA CARPET COLLECTION DESIGNS
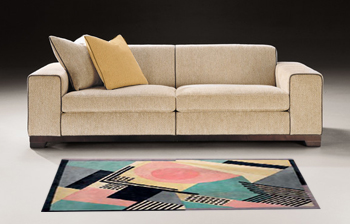
TWELVE NEEDLEPOINT CARPET DESIGNS TO CHOOSE FROM! Why not create a needlepoint area rug inspired by the feminine and luxurious allure of ART NOUVEAU ….. Or by well-known British designers from the ARTS and CRAFTS Movement? Or why not stitch an area rug pattern inspired by the ART DECO era…. a period famous for its revolutionary and striking abstract and geometric patterns, as shown in the photo above. All timeless designs that work well in today’s homes, and will last for generations! On the Shopping for Area Rugs page, you will see the sizes of the rugs listed. Contact us if you are looking for a custom size. NEW FEATURE FROM ZIVA: PRICE REDUCTIONS FOR AREA RUGS! Hand-painting these large canvases is labour-intensive. To reduce the cost to you, we offer an ALTERNATE PRICE OPTION to some of the area rug designs. That means we would NOT HAND-PAINT the central and/or background colour, where it’s feasible with the design motif. The Description Section on the Shopping Page states where this alternate option is available. Your choice. MORE TO COME! I’m presently developing some Persian and Modern needlepoint carpet designs to add to this collection!
ZIVA NEEDLEPOINT ART COLLECTION DESIGNS
NEW FROM ZIVA! NINE NEEDLEPOINT ART DESIGNS TO CHOOSE FROM!
A wonderful selection of needlepoint art designs on offer… modernist-inspired designs from the 1920’s flavoured with Art Nouveau touches and adventurous abstractionism! Or you could select minimalist designs inspired by the eloquent simplicity of Japanese designs also from the 1920’s. Celebrate the beauty of textile art and create a stunning tapestry for your home! Just as for Needlepoint carpets, Ziva offers PRICE REDUCTIONS FOR NEEDLEPOINT ART! On the Shopping for Needlepoint Art page, you will see the sizes of the tapestry designs listed PLUS the alternate pricing for NOT HAND-PAINTING the background for some of the designs. Have a look.
Again, Contact us if you are looking for a custom size.

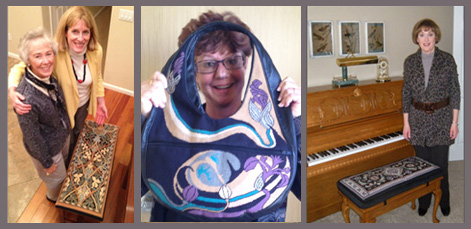
MAKING UP TIPS FOR NEEDLEPOINT ART On the Needlepoint Art page, we have included ideas for making up your textile art…. from wall hangings, to stretching the canvas on a wood frame... Or elegantly framing it like one of my clients, Starr (at right), has done with a deep burgundy suede mat and a majestic flat black frame. Stunning! Thanks for sharing your photo of your beautiful needlework ‘Poured Colours’ with us, Starr! ZIVA’S DESIGN UPDATES TESTIMONIALS
They’re ZIVA’s designs, but they’re your creations! Thank you for sending your wonderful Testimonials and letting us share them with our subscribers! Above left is Peg, whose stitched ‘Morris’ piano bench cover was featured in the last newsletter. Her tapestry is now upholstered and sitting handsomely in her son and daughter-in-law’s home. Karen (above centre) is proudly displaying her finished custom ‘Dutch Iris’ handbag . She’s stitched it exquisitely in a silk and wool blend thread from Silk and Ivory, with the side gusset and strap made up in soft black leather. And here’s Nancy (top right) standing beside her beautiful Tabriz piano bench seat pad ! Note the very clever use of straps to hold the seat pad to the bench top. Great idea! Keep sending your finished Ziva needlework: I’d love to share it with Ziva’s subscribers. WELL DONE TO ALL OF YOU !
YOUR STITCH TO TRY THE BRICK STITCH 
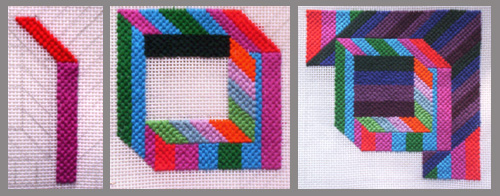
WHY THE BRICK STITCH? I created a funky OP ART cushon design for this newsletter… but what stitch to use? I wanted a stitch that would give me hard–edge, clean lines to be sure that the optical illusions in the design would work. It also had to be a stitch that works equally and precisely no matter whether it’s stitched horizontally, vertically or diagonally. The BRICK STITCH ticks all the boxes! You’ll notice with the photo above, I was able to create the hard edge of the cube by stitching the vertical stripes with the vertical Brick Stitch. I then stitched the Brick stitch horizontally for the horizontal stripes in order to emphasize the movement of the design. Likewise, its strong lines and flexibility enabled me to use it diagonally to strengthen the interaction between illusion and the picture plane.
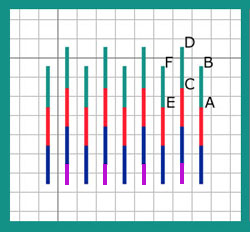
METHOD: Study the chart to the right. Take a piece of scrap canvas and yarn and practice the stitch, following the steps below:
PRACTICE FIRST!
Keep practicing until you feel confident that you’ve got it! Then you are ready to stitch the free design.
FREE DESIGN ‘SIXTIES ILLUSIONS’ CUSHION DESIGN 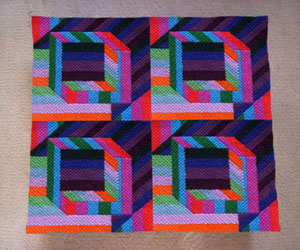
OP ART, POP ART and the SWINGING SIXTIES! Using the Brick stitch exclusively, I created several optical illusions in this ‘OP ART’ cushion design, inspired by the art movements of the ‘Swinging Sixties’. One square of this psychedelic design is approximately 6” square. Its 12 bright primary colours and geometric shapes can be repeated to create four squares for a 12” x 12” cushion (above) ; 6 squares for an 18” x 12” cushion etc. As big or as small as you want! The design takes on a different illusion, with each square interacting and vibrating with the one beside it! Groovy!
Other ways to use this design? Why not frame it for a bit of retro Op Art fun? What about making it up as a tote bag … also possible! Teens would love it! Go to the brick stitch free designs page to see some of these making up ideas. Other yarns? I stitched the design in cotton yarn (colours listed below), but it would look amazingly vibrant in silk or silk and wool blend yarns. NOTE: I doubled up the cotton yarn on my needle to hide the canvas. If you use other yarns, test how much yarn you need on your needle before you start. READING THE CHARTS: NOTE THE FOLLOWING:
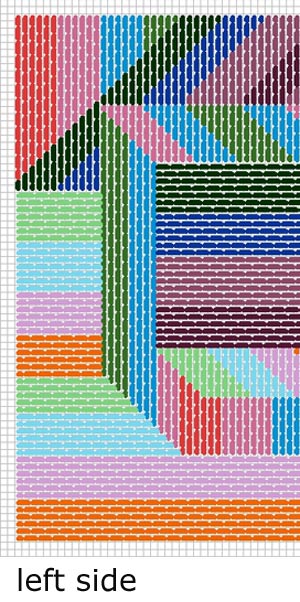
CHART #1 BRICK STITCH CHART LEFT SIDE
CHART #2 BRICK STITCH CHART RIGHT SIDE
YARN COLOURS NOTE: For best coverage of the canvas, double the yarn on your needle throughout. All colours for the cushion are chosen from DMC Soft Mat yarns. They are readily available at your local needlepoint shop or online.
12 DMC SOFT MAT yarn colours :
Taking into account of doubling the yarn for best coverage, you will need 2 skeins of each colour to stitch one 6” square of the design.
OTHER MATERIALS You will also need :
Go to the ZIVA site for more detail info on the MATERIALS required.
STITCHING IN PROGRESS
MAKING UP SUGGESTIONS In keeping with the bold nature of this retro design, look for fabric in a strong colour cotton or wool (or even silk?) as a backing fabric.
A knife edge finish for the edges would best suit the design. Go to the sewing needlepoint page for several other suggestions on finishing your cushion.
ASK THE ZIVA DIVA !
Encore moi !
QUESTION: How do I know what stitches will work best with your painted canvases? Thanks, Julia UK
Dear Julia,
Thanks for the question. I’d like to share it with our subscribers.
First of all, most of the designs I’ve developed and created for Ziva Needlepoint Designs are purposely very graphic and precise in nature. Special decorative stitches, and special detailing or shading are not normally part of the design. Also, I usually hand-paint the patterns on 12 or 14 gauge evenweave canvas, which is well-suited to this straightforward style.
Most of our designs can be stitched with the basic Tent Stitch. We always include charts of the standard tent stitches in your kit. Also included is how to read the canvas for an even finish.
If I think the design would be enhanced by a particular stitch, we’ll add instructions and a chart in the kit on how to do it. If you are an experienced ‘stitcher’, you will want to add your own creative ideas and talent to the mix. I love that idea.
I developed the design, and hand-painted it, but as you see from the testimonials above, the ultimate creation is yours!
Thanks for contacting me at ZIVA. Regards, Sylvia
WHAT NEXT?
The next VIVA ZIVA! Newsletter #1314 will be issued in the autumn of 2013. I’ll be including:
Please contact me if there is a particular stitch you’d like me to use for a free design in a future newsletter!
Share this newsletter with friends and relatives. Looking forward to sending you the next newsletter! Sylvia McLeod
|
| Back to Back Issues Page |