| Back to Back Issues Page |
 |
|
VIVA ZIVA ! newsletter: Volume # 2129: FREE PINCUSHION DESIGN October 28, 2021 |
V I V A Z I V A ! n e w s l e t t e r
NEWSLETTER #29 FREE CELTIC PINCUSHION DESIGN BASED ON CELTIC SYMBOLISM
Thanks so much for subscribing to the VIVA ZIVA! Newsletter. We’ll be issuing a newsletter semi-annually, with a new free design each time... exclusively created for the VIVA ZIVA! newsletter.
Included is one of our RECENT PAINTINGS…. a CUSTOM wall art design called ‘Yellow Cactus Flower’ plus TWO NEW DESIGNS COMING SOON ! of JAPANESE ‘BLUE IRISES’ adapted for cushions or wall art! Have a look! ….PLUS…… NOW AVAILABLE! ……TWO NEW ART DECO DESIGNS inspired by the Orient Express And…… a FREE PINCUSHION DESIGN BASED ON CELTIC SYMBOLISM!
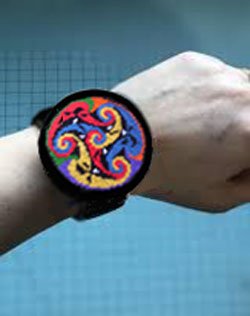
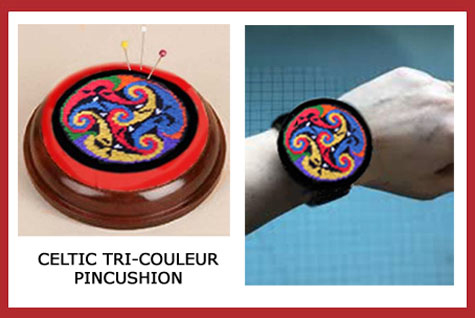
We have created this Celtic Pincushion Design based on Celtic Symbolism called ‘Celtic Tri-Couleur’’ Other free designs? ……. Click here to see our newsletter back issues with free designs that may interest you!
WHAT’S IN EACH VIVA ZIVA! NEWSLETTER?
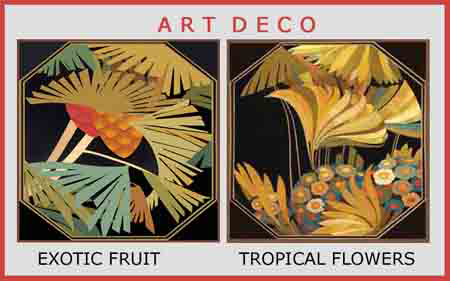
NOW AVAILABLE …TWO NEW ART DECO DESIGNS ADAPTED FROM THE ORIENT EXPRESS!
We adapted TWO more Art Deco cushion designs to complement our ‘DECO MANGO’ cushion design called
‘DECO EXOTIC FRUIT’ AND ‘DECO TROPICAL FLOWERS’ We have repeated similar colours, the same angular border detail and cushion sizes in all three cushion designs so they will work together in your décor. Go to our SHOPPING PAGES for details about sizes.
RECENT PAINTINGS
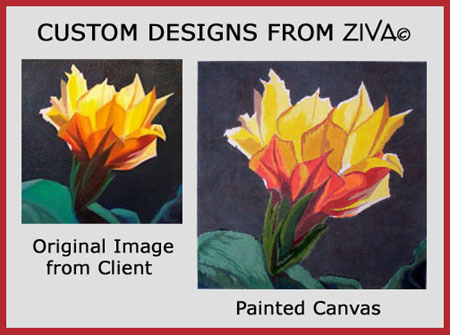
CUSTOM DESIGNS JUST FOR YOU!
We were recently asked by a client to create a custom small wall art panel (18”square/approx. 46 cm square)) from an image of a yellow cactus flower. It reminded us of the famous flower paintings by American artist, Georgia O’Keeffe!
To give our client a ‘painterly’ image like the original image sent, we mixed a similar range of colours using a shading technique that would create texture and variation.
For example, we used 12 warm colours gradated from pale yellow to dark reds for the actual flower, that, when combined, give a subtle variation in the colours and give an overall ‘painterly’ shading effect to the petals.
Do you have an image that you want to be created for needlepoint (cushions, seat covers, etc) … just for you?
Send us the image and we’ll advise you if it is possible. BUT PLEASE – no cute bunnies, kittens, puppies, or family portraits, etc. !
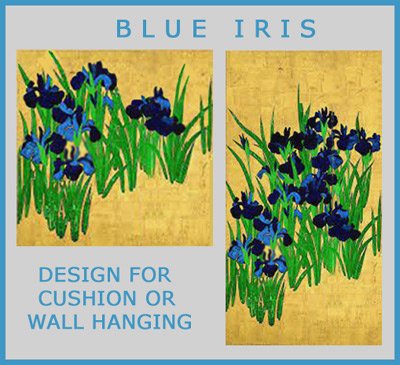
NEW DESIGNS COMING SOON! ……. TWO ‘BLUE IRISES’ JAPANESE DESIGNS THE ORIGINALS The original ‘Irises’ are a pair of six-panel folding screens by the Japanese artist Ogata Kōrin created at the beginning of the 18th century. It depicts an abstracted view of water with drifts of Japanese irises. The screens are now held by the Nezu Museum, in Tokyo, Japan and they are a National Treasure of Japan. In turn, copies of the screens are believed to have influenced the Post-Impressionist paintings of Vincent van Gogh, including his Irises (1889).
OUR ADAPTATION
We adapted one of the original Japanese ‘Irises’ panels to create two new asymmetrical delicate designs for both a cushion and a wall hanging. We retained the rich disciplined colour palette of blue irises in bloom, and their green foliage with a textured or non-textured gold-coloured background. Note: Your choice of the background painting technique.
FREE DESIGN ‘CELTIC TRI-COULEUR’ DESIGN CONCEPT FOR PINCUSHION The NUMBER 3 holds a special symbolism within the Celtic Culture… AND THIS IS WHERE WE GOT OUR IDEA FOR OUR FREE DESIGN!
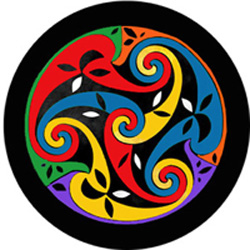
We combined the Triskele or Triple Spiral , which is a complex Celtic symbol of motion meaning “three legs” ….. with the basic Colour Theory of the 3 primary colours, red, yellow and blue to create a contemporary pincushion design…. CELTIC TRI-COULEUR . ET VOILA! A perfect combination of basic Colour Theory and Celtic Symbolism! Click here for more background on how we created our design adapted from Celtic Symbolism .
SIZES FOR PINCUSHION The size of the total stitched area without the border is approx. 2 ¾” inches (approx. 7 cm). For the wrist pincushion, you will probably need another 2-3 rows of the black (around the perimeter), depending on the size that works well with your wrist size. For the larger base pincushion, we used the small Sudberry House (https://www.sudberry.com) Pincushion Base (complete with foam cushion). We are suggesting you make the total stitched area 3 ¼” including the border . It will help you in the Making Up stage of the pincushion. Therefore, all you need to add to make the border is another 4 rows (round the perimeter) of either all black or 2 rows each of black and red (or any other colour from the stitched design). NOTE: It is smaller than the stitched design area of 3 ¾” suggested by Sudberry House. Refer to our Making Up Suggestions (below) for finishing the pincushion.
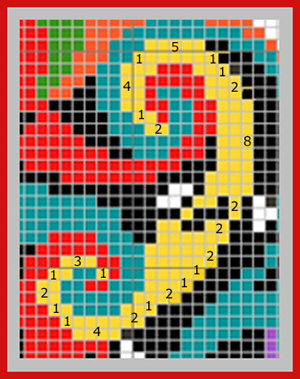
READING THE CHART: PINCUSHION CHART
YOUR TECHNIQUE TO TRY CREATING CURVES IN NEEDLEPOINT It’s always difficult to create a curve from small squares! But we face it every day when stitch painting! NOTE : With the images below, we’ve numbered the number of stitches at the end of each row so you can see how we stitched these shapes. 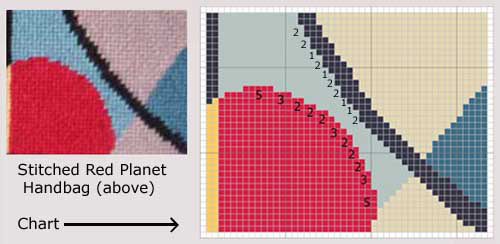
We’re showing you a part of our Circle Shape
Large Curve:
PRACTICE THE CURVES FIRST! If you need to practice creating the curves as shown, practice on a piece of both 14 hpi gauge and 18 hpi evenweave canvas first until you feel you are comfortable in stitching the Celtic Tri-Couleur Pincushion … which is all curves!
Applying this technique to the Celtic Tri-Couleur pincushion, we have highlighted the smaller yellow ‘leg’ showing the number of stitches at the end of each row to create the desired curves in motion. Again, you can see the 1’s and 2’s for the curves, with different ‘flat’ numbers of 1 stitch, depending on the shape desired. Hope this helps in creating this dynamic pincushion!
YARN COLOURS All the yarns for the Celtic Tri-Couleur pincushion were chosen from DMC Mouliné Spécial 6-ply cotton range of colours. They are readily available at your local needlepoint shop or online. PRIMARY COLOURS
SECONDARY COLOURS
NEUTRALS
YARN QUANTITIES As a guide for the pincushion threads, you will require approximately the following 6-ply cotton thread quantities:
NOTE: You will need 2 more skeins of #1 Red if you decide on a second outer border for pincushion on the base.
OTHER MATERIALS You will also need :
Go to the ZIVA site for more detail info on the MATERIALS required.
MAKING UP SUGGESTIONS WRIST PINCUSHION
PINCUSHION ON BASE
*NOTE: We’ve chosen using a light-weight backing fabric, for ease of attaching it to the base.
ASK THE ZIVA DIVA! We are asked this question at least a few times every week! We already answered it in our 2017 newsletter (#1721), but we thought it was worth repeating. QUESTION: I love your designs! What is the difference between woven canvas and interlock canvas and on what projects can I use them? Thanks, Dawn, Canada
ANSWER: Thank you contacting us at ZIVA Needlepoint Designs and your kind words about our designs. We’ve covered the different canvas types on a page on our site “Your Guide to Needlepoint Canvas” Briefly, here are the important points in choosing between them: EVENWEAVE WOVEN CANVAS Because it is woven, we recommend evenweave canvas for large projects, such as cushions and seat covers or any item where ‘give’ is a definite requirement. By the nature of the material i.e. woven, it provides this important feature, particularly with seat covers. We use evenweave canvas exclusively when painting needlepoint canvases for our clients. INTERLOCK CANVAS On a lot of our free designs projects, which are usually small, we use Interlock canvas. Because the thread intersections are fixed, there is no chance of it unravelling. Therefore, you can cut the canvas very closely to the finished tapestry, when making up the small item. WORD OF CAUTION For cushions and particularly seat covers mono interlock canvas does not ‘give’ and so a thread could easily snap with wear, leaving a hole in the canvas! I hope this brief guideline has been of help to you, Dawn. Best regards, Sylvia McLeod
WHAT NEXT?
The next VIVA ZIVA! Newsletter #2230 will be issued in the spring of 2022 . I’ll be including:
Please contact me if there is a particular stitch or technique you’d like me to use for a free design in a future newsletter!
Share this newsletter with friends and relatives. Looking forward to sending you the next newsletter! Sylvia McLeod
|
| Back to Back Issues Page |