| Back to Back Issues Page |
 |
| VIVA ZIVA ! newsletter: Volume # 1211: FREE NEEDLEPOINT JEWELLERY BOX INSERT DESIGN April 30, 2012 |
|
V I V A Z I V A ! n e w s l e t t e r ▪volume number: 1211 ▪ FREE NEEDLEPOINT JEWELLERY BOX INSERT DESIGN ▪ Thanks so much for subscribing to the VIVA ZIVA! Newsletter. I’ll be issuing a newsletter regularly, with a new free design each time... exclusively created for this newsletter. This time, I also want to show you the CUSTOM DESIGNS that I have been creating over the last several months.  Learn the Milanese Stitch and create this 30’s chic design, ‘MILANESE MODERNE’:
WHAT’S IN EACH VIVA ZIVA! NEWSLETTER?
NEW DESIGNS & UPDATES CUSTOM DESIGNS Recently, I’ve had some ingenious and sometimes challenging requests for CUSTOM DESIGNS that I would like to share with you. The following concepts that I presented to these clients were subsequently hand-painted on canvas for them. They are all presently being stitched! I’m looking forward to showing you their final tapestries. 
Throughout history, Symbolism has been used as a critical part of the art of design. To celebrate a couple’s 30th wedding anniversary, I created the ‘DAY LILIES’ cushion design which displays several symbolic elements:
The cushion’s French Art Nouveau style, and its remaining colours, complements the living room of their French home with its soft yellow walls, cream trim and deep terra cotta sofas. 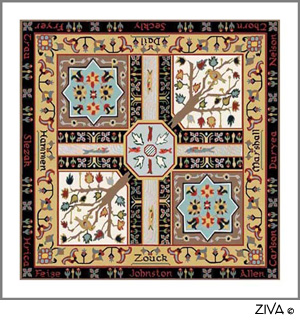
I modified the original Persian design for the ‘KHOSRO FOOTSTOOL’ to fit a very unique request…. to incorporate 16 family names into the design! Here’s how I did it:
The names have been purposely positioned to give the appearance of being an inherent part of the original Persian design. The lettering for the names has been created to reflect the intricate character and scale of the overall tapestry. Once completed, it will be a cherished family heirloom!
Another design modification! This time, it’s a change to the ‘DUTCH IRIS’ Handbag. My client requested that I paint the Dutch Iris design twice in order to have the tapestry on the front and back of the bag…… but with a twist! She asked me to develop a modified design for the back of the bag to allow for a full width zippered pocket when making it up. Her idea makes the front and back designs slightly different and gives the whole bag a unique custom look. Brilliant!
I hope these CUSTOM DESIGNS inspire you to challenge me to get my creative juices flowing and design something unique for you! YOUR STITCH TO TRY THE MILANESE STITCH 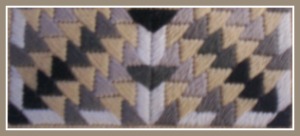
The Milanese Stitch is a diagonal stitch with the arrowheads facing in opposite directions. It’s so easy to learn and quick to stitch! Once the first row of triangles is stitched in a diagonal band, the rest just falls into place. With very exquisite results! 
METHOD: Study the chart to the right. Take a piece of scrap canvas and yarn and practice the stitch, following the steps below Note: The practice chart to the right shows the triangle created with this stitch over 4 threads. The ‘Milanese Moderne’ design for the jewellery box insert shown on the large charts below creates a larger triangle over 5 threads. PRACTICE FIRST! Keep practicing until you feel confident that you’ve got it! Then you are ready to stitch the free design. FREE DESIGN ‘MILANESE MODERNE’ JEWELLERY BOX INSERT DESIGN 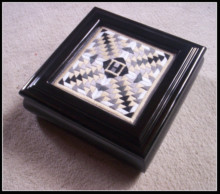
The MILANESE STITCH creates a 30’s chic design, designed specifically as an insert to complement this stylized jewellery box from Sudberry House. This black square jewellery box (‘Betsy Box’) which also has a 1930’s look complements the tapestry perfectly. They were made for each other!
COLOURS TO SUIT YOU This colour combination was perfect for my purposes as a gift for my daughter. Use your imagination and customize the design any way you like. For example, as an insert for a dark brown wood box (also available from Sudberry House), you may want to change the black to dark brown or taupe. Instead of the soft wheat colour accent, you may want to create something with bolder colours! SIZE TO SUIT YOU The small triangles of the Milanese stitch allow you to add more or less of them in a single diagonal row, to suit other box sizes. Just add the compensation stitches (as shown in the chart above) to square it off to the size you need. Adding a border can also make up the dimension difference. CUSTOM CENTRAL INITIAL You also can see in the photo that I stitched my daughter’s initial ‘H’ in the centre of the design. All with the compensation stitch, which is similar to the Satin or Gobelin Stitch. If you want to make up this free design, I’ll create a chart for your initial of choice, just contact me. My pleasure! READING THE CHARTS: NOTE THE FOLLOWING: CHART N° 1 The first chart below shows the total insert design.
CHART N° 2 The second chart below depicts approximately a quarter of the design so you can see the individual stitches more clearly.

YARN COLOURS All colours are chosen from Appleton Tapestry Yarns They are readily available at your local needlepoint shop or online. To stitch the design in the dimensions as shown, you will need four skeins of each colour.
OTHER MATERIALS You will also need : Go to the ZIVA site for more detail info on the MATERIALS required. STITCHING IN PROGRESS
MAKING UP SUGGESTIONS After blocking the tapestry, check the dimensions again to be sure that the stitched area is still 5” square. As mentioned above, I purchased the black jewellery box from the Sudberry House. Be sure when you purchase one of their boxes (or the equivalent from someone else) that it specifies ‘5” x 5” Visible Design Area’ to be sure the insert design ‘Milanese Moderne’ will fit. ASK THE ZIVA DIVA ! QUESTION: I’ve noticed on your site that you use mostly wool tapestry yarn for your designs. Can I substitute another yarn fibre? Thanks, Bev, UK Dear Bev, You’re right; I use wool almost exclusively for my designs. Aesthetically, wool has a rich texture and lovely depth of colour. There are an amazing number of beautiful colours from several manufacturers, such as Appleton, Anchor, DMC, etc. But equally important, because I have a lot of seat covers on the site, wool, being a strong fibre, wears well on upholstered pieces. You will note, however, that I have used cotton yarn for some of my small purses and bracelets, where I wanted more vibrant colours, and there is less wear on the tapestry to be concerned about. Other fibres? Of course, it’s your choice if you want to use another fibre yarn for one of my designs. But please discuss it with me, so I can advise you if I see a problem. Silk is a beautiful fibre, providing vivid colours with a lovely sheen. But, for example, it would be too fragile for a footstool cover. It would be better suited for a cushion, a small clutch bag, a necklace or as a decorative accent stitch. Silk and Wool yarn blends give you the benefits of the two fibres, but can be very expensive. I hope my response helps you in your decision of what fibre yarn options you have. WHAT NEXT? The next VIVA ZIVA! Newsletter #1212 will be issued in the fall of 2012 . I’ll be including: Please contact me if there is a particular stitch you’d like me to use for a free design in a future newsletter! Share this newsletter with friends and relatives. Looking forward to sending you the next newsletter! Sylvia McLeod |
| Back to Back Issues Page |


