Back to Back Issues Page
VIVA ZIVA ! newsletter: Volume # 1212: FREE NEEDLEPOINT SCISSORS CASE DESIGN
November 15, 2012

V I V A Z I V A ! n e w s l e t t e r

▪volume number: 1212 ▪ FREE NEEDLEPOINT SCISSORS CASE DESIGN

Thanks so much for subscribing to the VIVA ZIVA! Newsletter.

I’ll be issuing a newsletter regularly, with a new free design each time... exclusively created for this newsletter.

This time, I also want to give you a preview of the ZIVA CARPET COLLECTION designs that I’ll be releasing in the coming months!


Learn the Satin Stitch, along with how to do an embroidery stitch called Shading, and stitch this elegant Art Nouveau design, ‘SHADES OF SATIN” , to create an exquisite scissors case.


WHAT’S IN EACH VIVA ZIVA! NEWSLETTER?


  • New Designs & Updates
  • Your Stitch to Try
  • FREE Design
  • Ask the ZIVA DIVA!
  • Next Issue


NEW DESIGNS & UPDATES


ZIVA CARPET COLLECTION DESIGNS


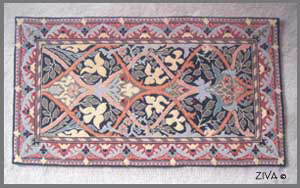
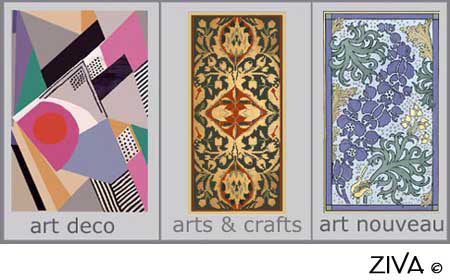
You’ve asked for more needlepoint area rug and carpet designs! They’re coming soon!

I’ll be introducing the ZIVA Carpet Collection gradually over the next few months…
to add to the William Morris-inspired area rug design (photo on right) that’s already on the site.


I’m creating a lot of styles… there will be one to suit the décor of your home!

From Persian designs, to Art Nouveau, Arts and Crafts, Art Deco, Mid-Century Modern, and Contemporary designs…. All coming soon!


ZIVA’S DESIGN UPDATES


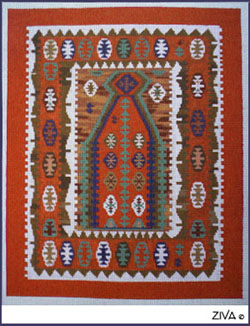
I created a custom shape for the ‘YURUK KILIM’ design specifically for a small rectangular footstool seat at 12.5” x 16”.

Since it’s smaller than the original square design you see on the site, I painted it on 14 hpi canvas so the detail wouldn’t be lost (photo of painted canvas on right).

Once stitched and upholstered on the footstool, it will be a dynamic addition to my client’s home. I can’t wait to see it!

For more detail and background about this intricate design, go to Footstools on the ZIVA Site.


It’s on the ZIVA site as a large cushion,….
but one of my clients wants to frame the ‘POURED COLOURS’ canvas I painted for her and hang it on the wall!

Why not!

For more detail and background about this dynamic design, go to Cushion Designs on the ZIVA Site.


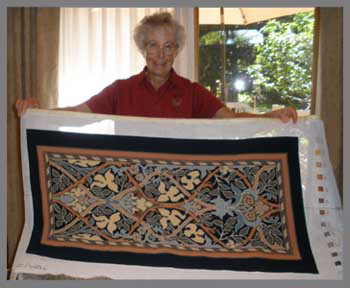
I’ve saved the best for last!

Peg B. from Oregon, USA, just sent me this photo of her superbly finished piano bench canvas of an Arts and Crafts design I painted for her.

Her stitching is stunning!

Now it’s off to the upholsterer! Congratulations, Peg!

For more detail and background about this elegant design, go to Seat Covers on the ZIVA Site.


YOUR STITCH TO TRY


THE SATIN STITCH


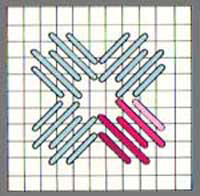
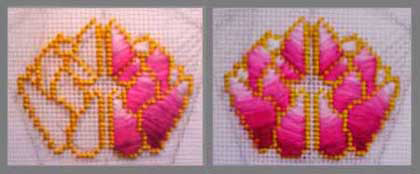
Try the Satin Stitch first as you see it on the chart to the right. This will give you the basic stitch for general use.

The Satin Stitch is a traditional embroidery stitch, where the stitches, in different lengths, are sloping over one or several threads. The direction of the stitches varies, depending on the desired effect.

For example, it’s used traditionally a great deal in creating leaf-like shapes on a canvas. By experimenting a bit, you can create leaves in varying shapes and sizes to suit your needs.


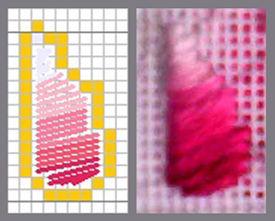
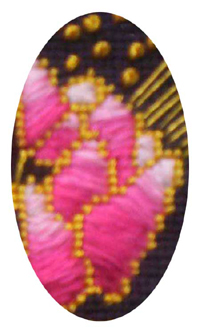
Now you’ve tried the basic Satin Stitch, let’s take it one step further!


The photo on the right shows the final effect you’ll want to achieve with the technique of SHADING with the Satin Stitch.


SHADING TECHNIQUE

  1. Choose a yarn that can be separated into individual fine threads, such as cotton, or crewel wool. (Or choose silk or silk and wool blends which are already very fine). For the Shades of Satin water lily design, I chose DMC SOFT MAT cotton.
  2. Select a range of 4 or 5 yarn colours from dark to light of the same basic colour e.g. such as the rose colour in photo above.
  3. Organize the skeins from dark to light on a work table, and label them A, B, C, D, etc.
  4. Start by separating the yarn into individual threads of the first colour ‘A’ (the darkest). In the Shades of Satin design, I used 3 threads of DMC cotton throughout. (Silks and silk and wool blends, being finer, will require more individual threads for best coverage.)
  5. Stitch a few rows of Satin Stitch at the bottom of the shape as shown on the chart above with colour ‘A’.
  6. Then stitch the next few rows with 2 threads of ‘A’ and 1 of ‘B’.
  7. Continue stitching up the shape changing the mix of threads as you go e.g. 2 ‘B’ and 1 ‘A, then 3 ‘B’, then 2 B and 1 C, etc.
  8. Be sure to finish at the top with the lightest colour of your range.

TIPS I LEARNED

I’ve never tried this before, but I soon got the knack! Here are a few tips I learned :

  • When you separate the yarn, make sure you separate all the threads, even when it’s 3 threads of the same colour. That way the texture is the same throughout and the coverage is better.
  • If you find that the shading is too striped, add a single thread lighter or darker depending on the desired effect, to reduce the striped effect.

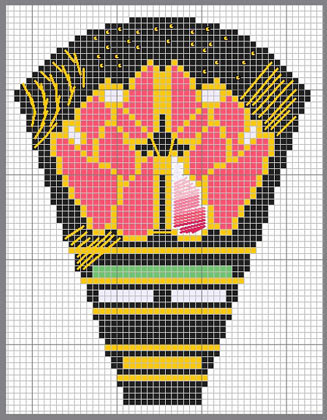
PRACTICE FIRST!

Keep practicing until you feel confident that you’ve got it! Then you are ready to stitch the free design.


FREE DESIGN


‘SHADES OF SATIN’ SCISSORS CASE DESIGN


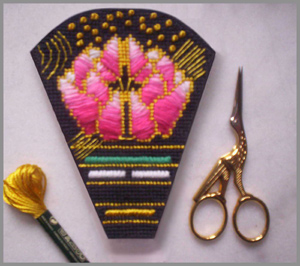
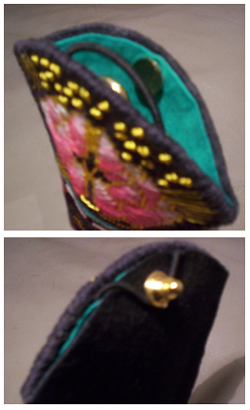
This elegant scissors’ case design, called ‘Shades of Satin’, was inspired by Monet’s Impressionist paintings of water lilies at Giverny.

The finished size, 3.5” (at its widest point) x 4.5” long (9 cm x 11.5 cm), is perfect for most embroidery scissors, like the pair shown in photo (1.75” w x 2.5” l). The case will accommodate scissors up to 2.5” wide and 3.5” long.

The Satin Stitch , with its shading, allowed me to create a three-dimensional ‘impressionistic’ effect for the water lily petals with a range of colours from deep rose to very light rose and finally white.


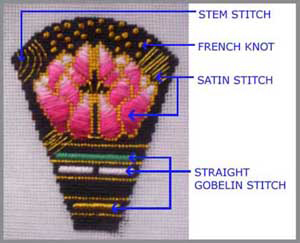
In the photo at right, I have depicted the different stitches you can use to create this scissors’ case. They help create the relevant symbolism to the over-all design.

  • The Stem Stitch and Satin Stitch depict the rays of golden sunshine on the water.
  • The French Knot illustrates bubbles floating from the water.
  • The Straight Gobelin Stitch gives the effect of the flat, water lily leaf.

NOTE: These stitches have already been featured in earlier newsletters:
To learn the Stem Stitch and French Knot, go to Newsletter #1005.
The Gobelin Stitch is demonstrated in Newsletter # 1007.
(Click here at newsletter back issues to see the list of back issues.)

READING THE CHART:

NOTE THE FOLLOWING:

  • For your reference, I have shown one of the water lily flower petals in the Satin Stitch just as you practiced it with the Shading in the Your Stitch To Try Section above.
  • All the remaining petals are also stitched in the Satin Stitch with the shading effect. Refer to the photo of the scissors’ case for the direction each one should slope.
  • The background charcoal colour is in the Basketweave Stitch.

YARN COLOURS

All colours for the scissors’ case are chosen from DMC yarns

They are readily available at your local needlepoint shop or online.

DMC SOFT MAT yarns:

  • White
  • #2776 light rose
  • #2899 light medium rose
  • #2309 rose
  • #2326 dark rose
  • #2956 turquoise green
  • # 2172 Charcoal

PLUS DMC Satin S3820 Gold

To stitch the design in the dimensions as shown, you will need 2 skeins of the Charcoal and Satin Gold. You will need 1 skein of the remaining colours.

OTHER MATERIALS

You will also need :

  • mono interlock canvas at 14 mesh,
    Size: 8” x 8” (20x 20 cm)
  • Needlepoint Needle: For 14-mesh canvas, use size 20 needle
  • Masking Tape
  • Scissors
  • fabric glue
  • For making up:
    • cotton for lining in colour of your choice (e.g. black, rose, gold, turquoise-green)
    • backing fabric in black or charcoal felt.
    • elastic and small decorative button or (tie) pin (for top closure)

    Go to the ZIVA site for more detail info on the MATERIALS required.

    STITCHING IN PROGRESS

    • As usual, start by putting masking tape on the canvas edges to protect the yarns from getting frayed.
    • Remember that the water lily design is near the top of the finished case. Be sure to leave enough canvas for the rest of the pattern.
    • STARTING UP : In the photo above left, I stitched the outline of the water lily petals first in the Satin Gold yarn.
      I then filled in the gold outlines with the Satin Stitch, with the Shading technique, just as you practiced.

    • IN PROGRESS: In the photo above right, I have just completed the water lily petals and am ready to start the rest of the case.

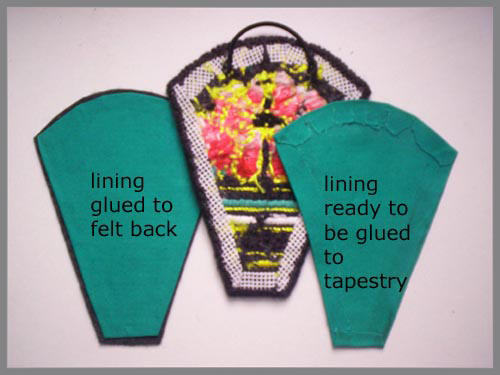
    MAKING UP SUGGESTIONS

    The following is the method of finishing I decided to go for, mainly to save time. I also think it gives a very neat finish.

    If you are a proficient sewer, sewing on the lining and backing fabric to make up the scissors case is also an option.

    Here’s what I did:(Refer to photo above)

    1. Trim the canvas around your stitching to leave a ½” seam. Turn all the seam allowances to the back, and stitch all the edges with the “Loop” Edge Stitch.

      NOTE: I’ve included a diagram of this stitch on the sewing needlepoint page on the ZIVA site.

    2. Clip the curves and corners of the seam allowance to make it as flat as possible, then, with fabric glue, glue it down to the back of the tapestry.
    3. Make a loop with a piece of elastic 3” long, and slip stitch to the top centre of the back of the tapestry.
    4. Use the tapestry shape as your pattern and cut two pieces of lining (turquoise-green cotton used here) the size of the tapestry PLUS ½” on all sides for the seam allowances.
    5. Cut a piece of black felt for the backing fabric the same size as the tapestry. (Felt doesn’t unravel so the edges don’t need to be finished.)
    6. Turn in all sides of both linings ½”, press, trim seams and clip curves. Glue seams down.(As shown in photo above.)
    7. Glue wrong sides of the black felt and one lining together. (As seen in photo above)
    8. Glue wrong sides of the tapestry and the other lining together.
    9. Apply the fabric glue approximately ¼” wide around the sides and bottom of both the lined tapestry and lined backing fabric. Glue together sides and bottom.
    10. Sew a decorative button on the back (it serves as the closure with the elastic). NOTE: I used a small gold tie pin instead to give the back of the case some glitz!


    This method is quick, very professional looking, and minimum sewing!


    ASK THE ZIVA DIVA !


    QUESTION:
    Dear Sylvia,

    If I order a painted canvas, how long does it for you to hand paint it? Love your designs! Thanks, Barbara, Toledo USA

    Dear Barbara,

    Thank you for your kind words about the designs.

    I understand that when an order is placed, the customer would like to receive it as soon as possible.

    There are two factors that determine the length of time it takes to paint a canvas for you and when you’ll receive it.

    • The first factor is the amount of detail in the design.
      For example, an 16” square cushion design with a simple Prairie Style pattern may only take 8-10 days to paint, whereas the same size cushion in a detailed Persian pattern, for instance, could take 20- 25 days. The prices reflect the amount of labour required.
    • The second factor is your timing when ordering.
      We, at ZIVA, work on a “first-come-first-serve basis”: it’s the fairest approach to take.

    PLEASE NOTE:

    When we receive an order, we immediately tell our client the start-up date.
    We also send out Progress Reports throughout the painting process to keep you up-to-date.

    I hope to receive your order soon, Barbara, and I promise you we’ll work diligently to get it to you as soon as we can!

    Best Regards, Sylvia


    WHAT NEXT?


    The next VIVA ZIVA! Newsletter #1313 will be issued in the spring of 2013.

    I’ll be including:

    • New Designs & Updates
    • A new Stitch to Try with a
    • Free needlepoint design: a contemporary design for a cushion.
    • And lots of other features!

    Please contact me if there is a particular stitch you’d like me to use for a free design in a future newsletter!

    Share this newsletter with friends and relatives.
    They can also go to my subscription page on the site to get on the mailing list for the next VIVA ZIVA! Newsletter

    Looking forward to sending you the next newsletter!

    Sylvia McLeod

Back to Back Issues Page