| Back to Back Issues Page |
 |
| VIVA ZIVA ! newsletter: Volume # 1620: FREE MODULAR FASHION ACCESSORY DESIGN November 25, 2016 |
|
V I V A Z I V A ! n e w s l e t t e r ▪volume number: 1620 ▪ FREE MODULAR FASHION ACCESSORY DESIGN ▪ Thanks so much for subscribing to the VIVA ZIVA! Newsletter. We’ll be issuing a newsletter regularly, with a new free design each time... exclusively created for the VIVA ZIVA! newsletter. STAINED GLASS THEME DESIGNS inspired by the Prairie Style and by Mackintosh for Wall Art and Tote/Handbags, NOW AVAILABLE! Also we thought you would like to see some of our RECENT PAINTINGS
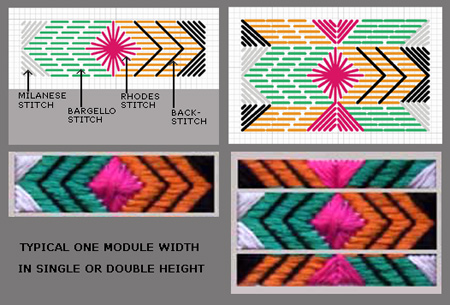
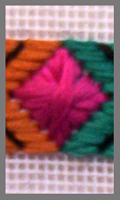
We’ve created this funky and bold modular motif, called ‘Liquorice Allsorts, for you to create several fashion accessories as our latest free design ….. We were able to create this very ‘NOW’ pattern, thanks to three easy-to do-stitches………. the RHODES Stitch, the Bargello Stitch and the Milanese Stitch. You will find the Bargello (#0902 newsletter) and Milanese (#1211 newsletter) stitches in earlier newsletters complete with charts, and the new Rhodes stitch is featured in this newsletter! Click here to see our newsletter back issues. WHAT’S IN EACH VIVA ZIVA! NEWSLETTER?
NEW DESIGNS & UPDATES STAINED GLASS THEME DESIGNS NOW AVAILABLE
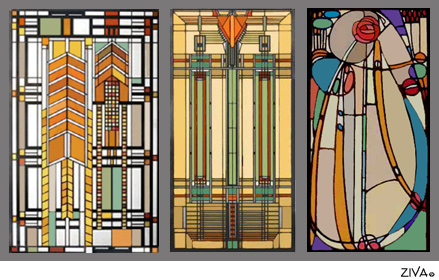
WALL ART Three new designs are now available of stained glass themed wall art inspired by two iconic architects and designers from the early 20th century …. Frank Lloyd Wright and Charles Rennie Mackintosh. What a contrast in the designs between these two avant-garde architects! ….. from Wright’s bold geometric Prairie Style shapes in a palette of earth tones to the Modernist free flowing rose motif by Mackintosh.
TOTEBAGS/HANDBAGS
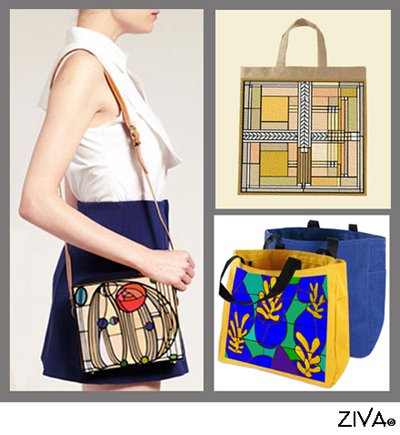
Our new tote bag motifs have been adapted from stained glass patterns created by three innovative geniuses of the early 20th century… architects and designers Charles Rennie Mackintosh and Frank Lloyd Wright … and artist and designer Henri Matisse. Available in 2 - 3 widths, they work well as tote bags or handbags!
RECENT PAINTINGS
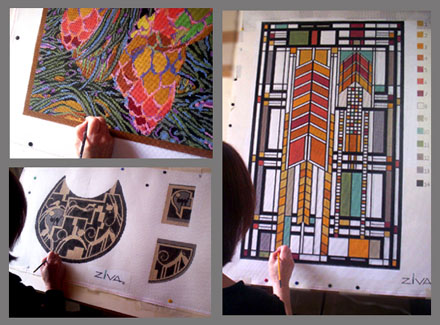
We’ve been very busy since our last newsletter in the spring! We’ve included a sampling here of the many hand-painted canvases we’ve been working on…….. from the Modernist ‘PINES AND NEEDLES’ cushion (top left), to the ‘CAT ON HOT TIN ROOF’ Art Deco handbag complete with back pockets (bottom left),……… and finally the magnificent ‘AUTUMN SUMAC’ wall tapestry. A wonderful mix of designs from different periods and styles!
YOUR STITCH TO TRY THE RHODES STITCH The RHODES Stitch creates a ‘bas relief’ diamond shape…. the perfect shape I needed for creating a needlepoint fashion accessory design!
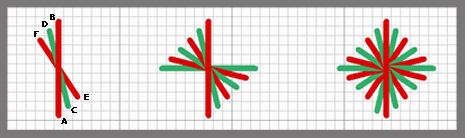
The completed Rhodes stitch! Quick and easy to stitch! The various angles of the stitches reflect the light and give it a jewel-like effect! NOTE: We used a satin cotton thread to enhance this effect and doubled it on the needle to be sure of full coverage of the 12 hpi canvas.
PRACTICE THIS NEW STITCH FIRST! Keep practicing following the sequence of stitching in the chart until you feel confident. Then you are ready to stitch the free design.
FREE DESIGN A MODULAR DESIGN THAT GROWS!
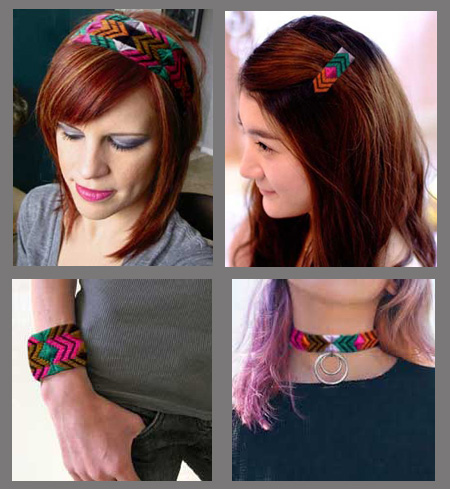
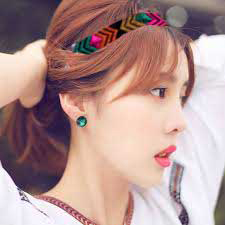
With one modular pattern, this free needlepoint design, called ‘Liquorice Allsorts’, can ‘grow’----- …… from a short or long hair barrette, to a narrow or wide hair band or a choker necklace or a bracelet! Lots of choices! Go to our free design page to see other ideas for this modular design!
READING THE CHART:
NOTE THE FOLLOWING :
YARN COLOURS The ‘Liquorice Allsorts’ yarn colours for this fashion accessory design are chosen from DMC Mouliné Spécial satin cotton yarns They are readily available at your local needlepoint shop or online. For quantities of each yarn colour, as a guide, allow one skein per one double module.
**NOTE: The Dark Gold yarn was not used for the module in the chart above. However, it was distributed throughout in other modules. Refer to the photo at the top of the newsletter. YOUR OWN CHOICE OF COLOURS? Choose any palette of colours that would coordinate with your wardrobe. Be your own designer! TIP: The six colours we selected were a range of 4 colours within the primary spectrum of red (rose colour), yellow (dark gold and yellow-orange) and blue (turquoise) PLUS one light (light grey)and one dark (black) neutral. Developing a range similar to this mix will give you the best balance for the design. OTHER MATERIALS You will also need :
Go to the ZIVA site for more detail info on the MATERIALS required.
STARTING UP
MAKING UP SUGGESTIONS
ASK THE ZIVA DIVA! QUESTION: ”I have completed a small needlepoint purse and would like to have it made up for me professionally. Can you please help?” (Sent from USA) I’m asked this question at least twice a week! It’s my best advice no matter where you live. ANSWER: “Thank you contacting us at ZIVA Needlepoint Designs. We are a needlepoint design studio in France, so are not in a position to recommend any particular service in the USA. However, there are many needlepoint shops in the USA that provide needlepoint finishing services. If you are not close to a shop, you can go online and Google 'needlepoint finishing services'. For making up my designs, I personally prefer to go to my local fabric shop or needlepoint shop (who provide this service) or to a seamstress. Some of my handbag designs are very structured, and I have even used a local upholsterer at times. You've just spent a great deal of time stitching the purse, and it would be best to meet and talk to someone locally to have an input on how it's to be finished and the quality of finishing.* I hope the above gives you some guidance on the next step. Good luck with finishing you project! Best regards, Sylvia McLeod” *NOTE TO SUBSCRIBERS: To add to this response, I also think it’s a very good idea during your discussions with them to see what other similar work they have done, so you can judge the quality of their work.
WHAT NEXT? The next VIVA ZIVA! Newsletter #1721 will be issued in the spring of 2017 . I’ll be including:
Please contact me if there is a particular stitch you’d like me to use for a free design in a future newsletter! Share this newsletter with friends and relatives. Looking forward to sending you the next newsletter! Sylvia McLeod |
| Back to Back Issues Page |