| Back to Back Issues Page |
 |
| VIVA ZIVA ! newsletter: Volume # 1721: FREE COIN PURSE/CARD HOLDER DESIGN June 08, 2017 |
|
V I V A Z I V A ! n e w s l e t t e r ▪volume number: 1620 ▪ FREE COIN PURSE/CARD HOLDER DESIGN ▪ Thanks so much for subscribing to the VIVA ZIVA! Newsletter. We’ll be issuing a newsletter regularly, with a new free design each time... exclusively created for the VIVA ZIVA! newsletter. STAINED GLASS THEMES for Cushion Designs inspired by Early Modernism, the Prairie Style and Scottish architect Mackintosh, are NOW AVAILABLE! Also we thought you would like to see some of our RECENT PAINTINGS
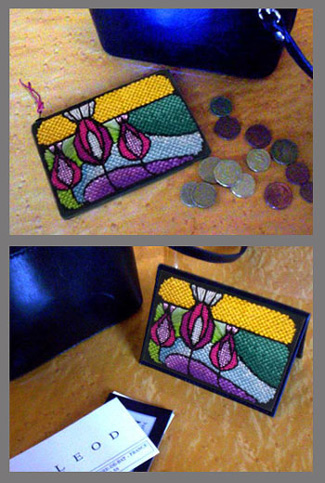
We’ve created a luminous stained glass free design called ‘SPRING BLING’ for a coin purse or card holder case featuring a new stitch to learn….. the SPLIT STITCH . To help us achieve this translucent effect, we also used the Sloping Bargello Stitch (#0902 newsletter) and the Brick Stitch (#1313 newsletter). Click here to see our newsletter back issues. WHAT’S IN EACH VIVA ZIVA! NEWSLETTER?
NEW DESIGNS & UPDATES STAINED GLASS CUSHION DESIGNS ADDED TO ZIVA’S COLLECTION!
Four new designs are now available of stained glass cushion motifs inspired by the design movements of the early 20th century …. from Early Modernism to iconic architects Frank Lloyd Wright and Charles Rennie Mackintosh. Their dynamism and elegance are timeless! RECENT PAINTINGS
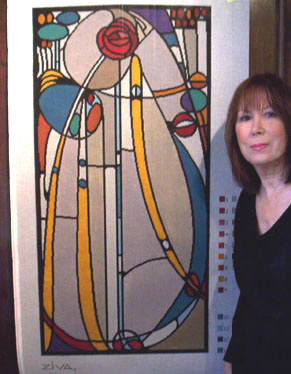
More samplings of recent paintings ! FIRST ABOVE…… The iconic Mackintosh ‘SUMMER ROSE’ wall tapestry is ready to ship..... but first, I wanted to give you an idea of the scale of the 20" x 40" painted canvas..... IT WILL LOOK STUNNING FINISHED AS A WALL TAPESTRY!

We’ve just completed painting a delicate Art Nouveau cushion design (above) called ‘SPRING BUDS’,created in a subtle spring palette of cream, light gold, soft grey, mauve and mauve-blue. I’ve also included a close-up (top right) of the Spring Buds motif to show you the painting detail required to create this delicate design on 14 mesh canvas. By ‘STITCH PAINTING’, we create a precise stitching guide ….. no guesswork so it’s more pleasurable for you! YOUR STITCH TO TRY
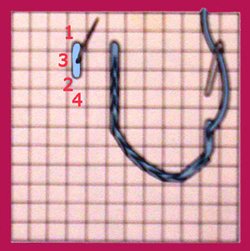
THE SPLIT STITCH The SPLIT Stitch,because of its delicacy and fineness, works perfectly as the ‘lead’ to outline the ‘stained glass’ panels of our free design motif ‘Spring Bling’.
HOW TO DO THE SPLIT STITCH:
To form a smooth line, it is important to always come up in a hole that has previously been used for going down. On straight lines, the size of the stitch may be increased, but on tight curves, the stitch must be kept short. NOTE: We used various types of cotton thread to enhance the stained glass effect and doubled it on the needle to be sure of full coverage of the 14 hpi canvas.
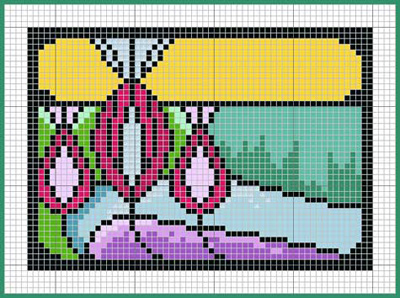
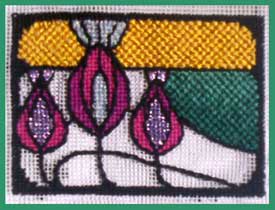
PRACTICE THIS NEW STITCH FIRST! Keep practicing following the sequence of stitching in the chart until you feel confident. Then you are ready to stitch the free design. FREE DESIGN FOR A STUNNING STAINED GLASS EFFECT
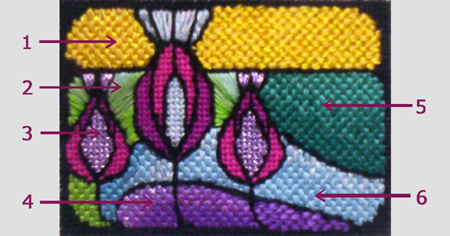
We adapted an original Art Nouveau stained glass panel to create a dynamic motif of spring buds emerging through the ground in a blaze of dazzling colours….. reaching for the warm spring sun! NOTE: We selected this small stained glass motif in order to show you various yarns and stitches you could use for depicting a stained case effect.
A perfect reference if you choose one of our new stained glass wall art, tote bags or cushion designs to stitch!
READING THE CHART:
NOTE THE FOLLOWING :
CREATING THE STAINED GLASS EFFECT Our objective was to have the yarn types, colours and stitch types working together to create a radiant stained glass effect. NOTE: All stitching effects were created with two strands of threads on the needle Here’s how we did it:
YARN COLOURS The ‘Spring Bling’ yarn colours for this chic design are chosen from a variety of types of DMC cotton yarns and one Silk Mill Silk They are readily available at your local needlepoint shop or online. For quantities of each yarn colour, as a guide, allow two skeins per colour to allow for doubling the thread on the needle.
OTHER MATERIALS You will also need :
Go to the ZIVA site for more detail info on the MATERIALS required.
STARTING UP
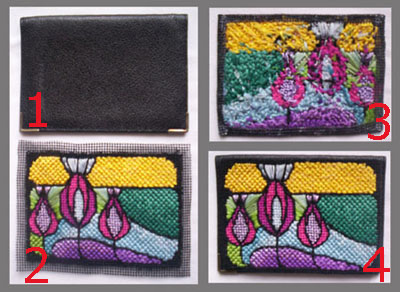
MAKING UP SUGGESTIONS Coin Purse
Card Holder Case For the card holder case, you can attach it to a purchased card holder case as shown below or make it up in fabric or simulated leather.
Refer to image above:
It’s now an elegant case for my credit cards in my small black leather evening bag! ASK THE ZIVA DIVA! QUESTION: What is the difference between interlock canvas and woven canvas and when should I use them? Caroline, New Zealand ANSWER: “Thank you contacting us at ZIVA Needlepoint Designs. I’ve covered the different canvas types on a page on our site “Your Guide to Needlepoint Canvas” Briefly, here are the salient points in choosing between them:EVENWEAVE WOVEN CANVAS Because it is woven, we recommend evenweave canvas for large projects, such as cushions and seat covers or any item where ‘give’ is a definite requirement. By the nature of the material i.e. woven, it provides this important feature. I use evenweave canvas almost exclusively when painting needlepoint canvases for my clients. INTERLOCK CANVAS On most of our free designs projects, which are usually small, we use Interlock canvas. Because the thread intersections are fixed, there is no chance of it unravelling. Therefore you can cut the canvas very closely to the finished tapestry, just as we demonstrated in this newsletter when making up the card holder case. WORD OF WARNING For cushions and particularly seat covers, mono interlock canvas does not ‘give’ and so a thread could easily snap with wear, leaving a hole in the canvas! I hope this brief guideline has been of help to you, Caroline. Best regards, Sylvia McLeod”
WHAT NEXT? The next VIVA ZIVA! Newsletter #1722 will be issued in the fall of 2017 . I’ll be including:
Please contact me if there is a particular stitch you’d like me to use for a free design in a future newsletter! Share this newsletter with friends and relatives. Looking forward to sending you the next newsletter! Sylvia McLeod |
| Back to Back Issues Page |