| Back to Back Issues Page |
 |
|
VIVA ZIVA ! newsletter: Volume # 1416: FREE SCENTED SACHET DESIGN October 30, 2014 |
V I V A Z I V A ! n e w s l e t t e r ▪volume number: 1416 ▪ FREE SCENTED SACHET DESIGN ▪
Thanks so much for subscribing to the VIVA ZIVA! Newsletter. We’ll be issuing a newsletter regularly, with a new free design each time... exclusively created for the VIVA ZIVA! newsletter. NEW DESIGNS JUST RELEASED! We’ve just added 4 MORE CONTEMPORARY CUSHION DESIGNS to the ZIVA CASA Cushion Collection….. PLUS OUR CHARTS ARE NOW READY TO ORDER for our collar necklaces and small purses!
STITCH THIS CHARMING FRENCH SCENTED SACHET AND FILL WITH LAVENDER TO SCENT YOUR HOME … our latest free design! You will also learn a new stitch….. the BACK STITCH.
WHAT’S IN EACH VIVA ZIVA! NEWSLETTER?
NEW DESIGNS & UPDATES NEW CONTEMPORARY CUSHION DESIGNS
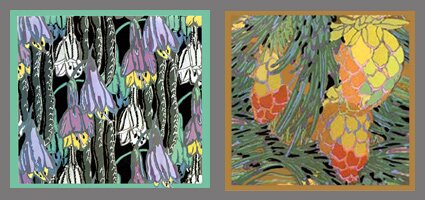
ABOVE LEFT: This rhythmic delicate design called 'Cascading Fuchsias' is full of flowing floral textures… ideal inspiration for the inherent tactile nature of needlepoint. ABOVE RIGHT: This dramatic design called 'Pines and Needles' was originally created as a wall hanging for our Needlepoint Art Modernist Collection. We reworked the design for a custom footstool ….and now we are offering it to you as a Modernist Art Cushion Design!
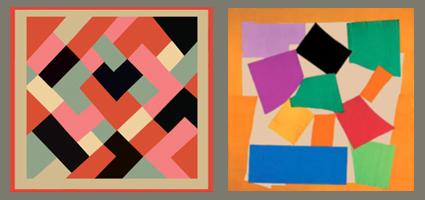
…MINIMALISM AND MATISSE!
ABOVE LEFT: Our cushion, ‘Parisian Colour Blocks’ is a classic example of designs created by artist and textile designer extraordinaire Sonia Delaunay in Paris in the 1930’s. ABOVE RIGHT: A related palette of bright primary colours artfully arranged into the shape of a snail to create a new abstract cushion design…'Matisse’s Snail'!
ZIVA’S DESIGN UPDATES ZIVA CHARTS UPDATE
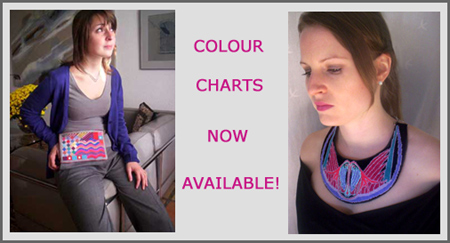
COLOUR GRID CHARTS FOR OUR 6 SMALL PURSES AND OUR 5 COLLAR NECKLACES ARE NOW AVAILABLE!
GO SHOPPING FOR NEEDLEPOINT CHARTS AT ZIVA!
Coming soon….. colour grid charts for our bracelets and small cases!
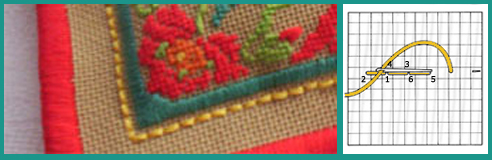
YOUR STITCH TO TRY THE BACK STITCH The Back Stitch is usually worked over 1 or 2 threads and is often used for outlining. For the ‘Poppies and Lavender’ scented sachet, we used it in yellow thread to attach the open-weave natural linen pocket (for filling with lavender) to the back of the needlepoint canvas. It was worked over 3 threads for this design. See Making-Up Suggestions below.
As shown in the diagram above, bring the needle up at 1 and down at 2, make a long stitch behind the canvas, going back on yourself, and come up at 3, ready for the second stitch. Continue in this way, going down at 4, up at 5, down at 6, and so on. PRACTICE THIS NEW STITCH FIRST! Keep practicing following the sequence of stitching in the charts until you feel confident. Then you are ready to stitch the free design.
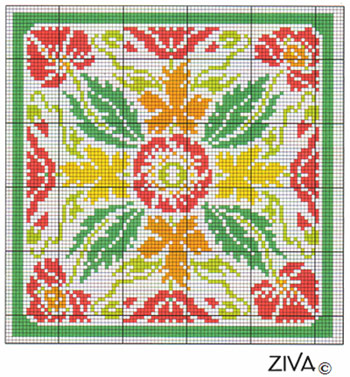
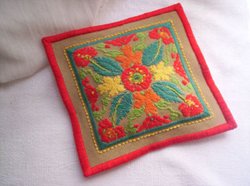
FREE DESIGN ‘POPPIES AND LAVENDER’ SCENTED SACHET DESIGN 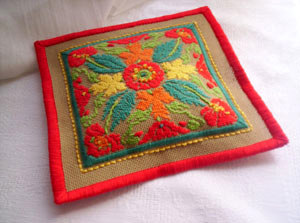
We’ve designed a sachet with stylized poppy flowers and leaves with the antique-coloured needlepoint canvas background exposed, giving the stitching a ‘bas-relief’ effect. This exposed canvas technique allows more scent from the lavender to perfume your linen or clothing drawers and wardrobes. You can stitch the sachet in two sizes: 5” x 5” or 6.5” x 6.5” (12.5 cm square or 16.5 cm square) As a Canadian living in France, I decided on a theme of poppies in an early 20th century European motif as the ideal cultural combination to mark the centenary of the start of the First World War. Click here to get more background and detail on the design and its historical and cultural relevance.
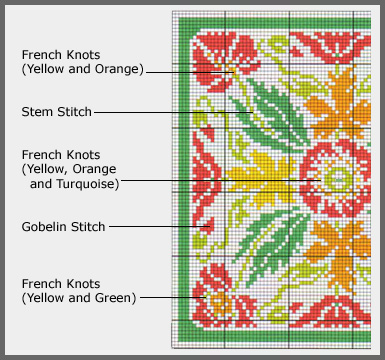
OPTIONAL STITCHES The entire design can be stitched in the Tent Stitch. However, you also have the option of using several decorative stitches such as, Stem Stitch, French Knot, Straight Gobelin stitch. . See Optional Stitches Chart below for their distribution. NOTE: All these optional stitches have featured in our previous newsletters.
The Edge Loop Stitch was used to finish the outside edges for both sizes.
READING THE CHARTS:
TWO CHARTS FOR THE ‘POPPIES AND LAVENDER’ SACHET DESIGN CHART #1: FULL CHART NOTE THE FOLLOWING:
PARTIAL CHART # 2: OPTIONAL STITCHES CHART I’ve added this chart in case you want to stitch some decorative stitches to the sachet tapestry. I like this idea because these stitches add to the dimensional quality of the needlework. I’ve shown these optional stitches and their colours where I thought they would work. But it’s entirely up to you. Make it your own!
NOTE: I’ve only shown the designation of these stitches once on this partial chart. They would be repeated on similar parts of the motif throughout.
YARN COLOURS
All colours for the scented sachet are chosen from DMC 25 Mouliné Special 100% cotton yarns. They are readily available at your local needlepoint shop or online.
5 DMC 25 Mouliné Special yarn colours :
OTHER MATERIALS You will also need :
Go to the ZIVA site for more detail info on the MATERIALS required.
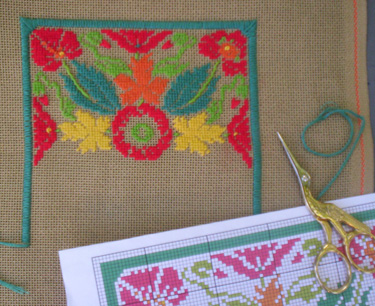
STARTING UP AND STITCHING IN PROGRESS
STRAIGHTFORWARD STITCHING…JUST FOLLOW THE CHART!
NOTE THE FOLLOWING:
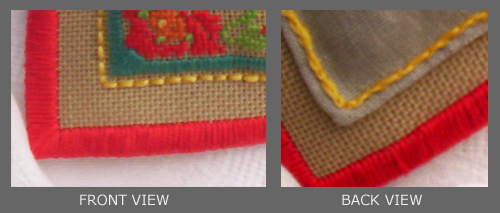
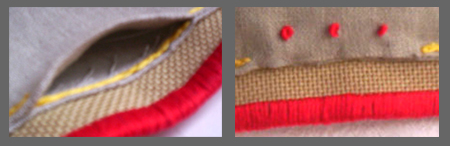
MAKING UP SUGGESTIONS FINISHING TECHNIQUES FOR A HAND-CRAFTED LOOK! LARGE SACHET: USING THE BACK STITCH TO FASTEN LINEN BACK POCKET
NOTE: On the back of the sachet when stitching the back stitch, I placed the needle in the middle of the cotton thread to create a chain stitch effect. See photo above.
In the photo above left, I stitched the back stitch on one side only at the back opening, so it will be continuous on the front of the sachet.
After I filled it with lavender, I slipped stitched the opening closed with normal sewing thread, and added 3 French Knots in red yarn for a decorative finish!
SMALL SACHET: USING THE LOOP STITCH TO FASTEN LINEN BACK POCKET

For the smaller sachet, you now add the turquoise-green border in the loop stitch and use it to attach the back pocket: Here’s how:
Congratulations! You have just created a truly hand-crafted piece of needlework in keeping with the period of the design! IT’S NOW READY TO ADD A WONDERFUL NATURAL SCENT TO YOUR WARDROBE OR LINEN CUPBOARD!
ASK THE ZIVA DIVA! QUESTION: Do you think it’s a good idea to add an extra row of stitching when finishing your needlework to hide the canvas at the edges? I’m not sure what to do. Thanks, Janet from France
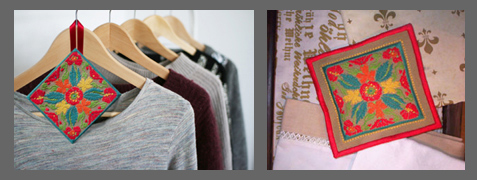
Dear Janet, In principal, it is a good idea….. BUT it does depend on the gauge of your canvas and the thickness of your yarn. The extra row becomes part of the seam allowance when making up your needlepoint. In my experience, if the canvas gauge is too large, say 12 – 14 hpi, and the yarn too heavy, you may end up with very bulky and not very precise seams. However, I have stitched the extra row on the outside edges of my needlepoint collar necklaces, and it worked very well. The reason being that I used a fine silk and wool thread, and stitched the necklaces on 18 holes per inch evenweave canvas. I machine-stitched the necklace tapestry to a fine lining, to create a clean, crisp edge, which sits well around the neck. You can see the finished ‘Rose Feathers’ necklace our model is wearing above, or go to ZIVA’s Needlepoint Necklaces page to see our whole range of collar necklace designs. NOTE: If you’re not confident with your sewing skills for finishing, I strongly advise you to talk to a professional seamstress or upholsterer before stitching the extra row. They may be able to sew and assemble your needlework without extra stitching. I trust that these tips have helped you on finishing your needlepoint project. Best Regards, Sylvia
HAVE YOUR SAY! What is your experience adding an extra row of stitching? Was it a mistake or did it help you? If you’ve got a tip for finishing a FASHION (handbag, belt, etc.) accessory with an extra row, please click here . Have you added an extra row of stitching when creating a tapestry for your HOME (seat cover, footstool, etc.)? Click here with your experience. PLEASE JOIN IN THE DISCUSSION! WHAT NEXT?
The next VIVA ZIVA! Newsletter #1517 will be issued in the spring of 2015. I’ll be including:
Please contact me if there is a particular stitch you’d like me to use for a free design in a future newsletter!
Share this newsletter with friends and relatives. Looking forward to sending you the next newsletter! Sylvia McLeod
|
| Back to Back Issues Page |