V I V A Z I V A ! n e w s l e t t e r

▪volume number: 1108▪ FREE NECKLACE DESIGN

Thanks so much for subscribing to the VIVA ZIVA! Newsletter.

I’ll be issuing a newsletter every three months, with a new free design each time... exclusively created for the newsletter.

Stitch this contemporary abstract art design ‘CITY MOSAICS’ NECKLACE ready to wear for a fun evening out!


WHAT’S IN EACH VIVA ZIVA! NEWSLETTER?


  • New Designs & Updates
  • Your Stitch to Try
  • FREE Design
  • Ask the ZIVA DIVA!
  • Next Issue


NEW DESIGNS & UPDATES


NEW CLUTCH BAG DESIGNS !


‘Sea Creatures’ Clutch Bag Strap

Stitch this vibrant Matisse design and add it as a strap to an easy-to-sew rectangular clutch bag.

What could be simpler to create an eye-catching handbag!

I’ve also designed a second clutch bag strap design ‘MIAMI DECO’ for those Art Deco lovers!

Click here to learn more about these new dynamic designs.

NOTE:

More clutch bag designs are coming that are easy to sew from a pattern. I’ll keep you up-to-date in future newsletters.


SITE UPDATE


ZIVA GIFT CERTIFICATE


A needlepoint Gift Certificate from ZIVA is perfect for that special someone in your life who loves to stitch or would love to learn!

There’s a needlepoint design to suit any budget!

And also you give your loved one the relaxing pastime of stitching a lovely tapestry they’ll cherish forever!

Click here for more details.


YOUR STITCH TO TRY


THE MOSAIC STITCH


The Mosaic Stitch is a simple and easy stitch to master!

METHOD:

Three diagonal stitches are worked over 1, 2 and 1 threads to form a small block or square.

These blocks can be worked horizontally or vertically across the canvas.

They also can be worked in diagonal rows, which is exactly what I wanted for creating the abstract necklace design for this newsletter!


Study the chart to the right.

  • On a scrap piece of canvas, work the stitch by bringing the needle up at 1 and down at 2 to create the first 1-thread diagonal stitch.
  • Continue to create the larger 2-thread diagonal stitch (3 & 4)
  • Finish the block with the last 1-thread diagonal stitch (5 & 6)

It’s as easy as that!

On this chart you can also see how you can change the yarn colour of one (or 2) of the 45 ° diagonal stitches and still create the block. Try this as well. The necklace design has this feature, and it’s good to practice it.


PRACTICE FIRST!

Keep practicing until you feel confident that you’ve got it! Then you are ready to stitch the free design.


FREE DESIGN


‘CITY MOSAICS’ NECKLACE DESIGN

This dramatic needlepoint necklace is approx. 2.5” x 3.5” with bold primary colours of… red, a range of blues, teals and turquoises with neutrals of silver, titanium grey and black!

A palette to suit any wardrobe or occasion!

The square block shapes created by the Mosaic Stitch together with the grey and silver metallic threads fashion a sophisticated shimmering jewel–like pattern.


READING THE CHARTS:

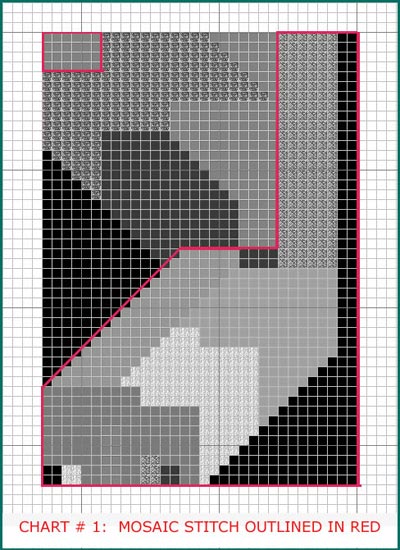
CHART # 1

  • I created this first chart below in black and white so you can easily see the red outline where you stitch the Mosaic Stitch.
  • The rest of the necklace is stitched in the tent Basketweave Stitch.

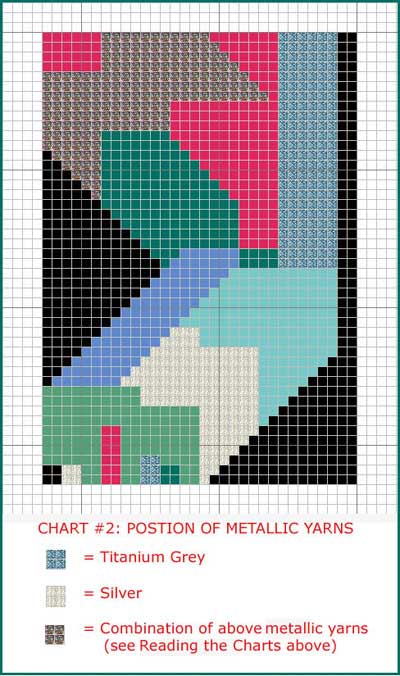
CHART # 2

  • This chart below shows the distribution of all the colours (see list of yarn colours below) at 14 gauge mesh canvas.
  • It also shows you the code for the distribution of the metallic yarns.

    NOTE: You will note that the third code says that the metallic yarn is a combination of the other two metallic colours.
    I wanted to create a metallic colour in mid-grey, so I took 3 strands from each of the silver and titanium grey and put them on the same needle, and created and stitched a third metallic colour!

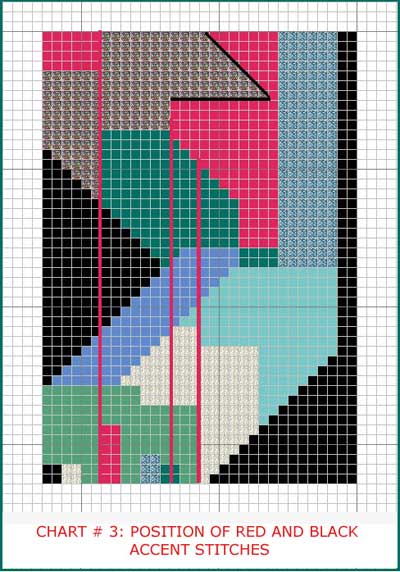
CHART # 3

  • This last chart below shows the position of the red and black accent stitches which you add on after the necklace is completely stitched and blocked.
  • These accent stitches are important because they add to the abstract character of the design and give depth to the necklace.

YARN COLOURS

A skein of each of the following colours is required:

Metallic Yarns: DMC Light effects

  • E168 Silver Precious Metal Effects
  • E317 Titanium Grey Precious Metal Effects

Cotton Yarns: DMC Mat Soft Cotton

  • Red #2326
  • Black #2310
  • Dark Teal #2595
  • Light Blue # 2807
  • Ultramarine Blue #2122
  • Turquoise Green #2133

All are readily available at your local needlepoint shop or online.

OTHER MATERIALS

You will also need :

  • mono interlock canvas at 14 gauge,
    Size: 6” x 8” (15 x 20 cm)
  • Needlepoint Needle: For 14-mesh canvas, use size 20 needle
  • Masking Tape
  • Scissors
  • medium-weight cardboard and black lining
  • Black waterproof marker or black acrylic paint
  • 2 small metallic rings
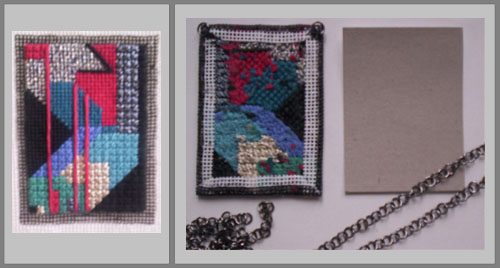
  • metal chain: 33.5” (85 cm)long (as shown in photo above)
  • pliers
  • Go to the ZIVA site for more detail info on the MATERIALS required.

    STARTING UP /STITCHING IN PROGRESS

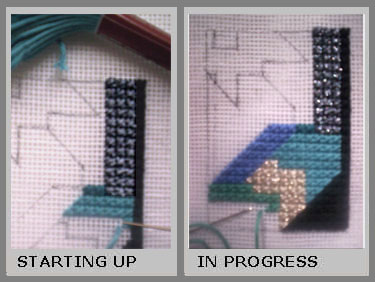
    STARTING UP

    • As usual, start by putting masking tape on the canvas edges to protect the yarns from getting frayed.
    • Determine and mark (with a waterproof marker) the centre lines of the canvas in order to place the design approximately in the middle of the canvas.
    • Start with the black cotton yarn at the top right of the design and stitch the first mosaic stitch block.
    • Repeat the mosaic stitch in black vertically until you have stitched 23 blocks total. You’ve now established the reference point for the rest of the design in the mosaic stitch.
    • Using the chart #2 above as your reference throughout, stitch three blocks wide of the metallic titanium grey for 12 blocks vertically.
    • Next, start the range of blues and turquoises in the mosaic stitch. Keep referring to the chart #2.
    • NOTE: Since the mosaic stitch block consists of 3 diagonal stitches, you will notice that the yarn colours may change within the block to create the 45° angle required for the abstract design. Just as you practiced it!

    STITCHING IN PROGRESS

    • The In Progress photo above shows the mosaic stitch in turquoise almost completed.
    • Once you are finished the mosaic stitch at the bottom left, you just have the top left to do in the mosaic stitch of 3 blocks wide and 2 blocks high in red. (Refer to chart #2)
    • The rest of the design is stitched in the Basketweave Stitch.
    • The metallic yarn colour used in the top left of the design was created by using 3 strands of the silver yarn and 3 strands of the titanium grey on the same needle. It was also stitched in the Basketweave Stitch. A third metallic colour is created!

      NOTE: Metallic yarn is stiffer than regular yarn, so reduce the length of the strands when you use it, so it’s easier to handle.

    FINISHING THE NECKLACE

    After blocking the canvas, you are now ready to finish the necklace!

    Here’s what you do:

    • ACCENT STITCHES:
      • First, referring to Chart #3 above, feed up each strand of the red yarns and black yarns from the back at the positions shown.
      • Pull slightly taut and feed to the back at the other end and secure. Lightly glue the back of the red yarns so they stay in position (optional).
    • To prevent the white canvas edge from showing on the finished necklace, paint with black acrylic paint a few rows of the canvas around the perimeter of the necklace. (See above photo at left) NOTE: A black waterproof pen will work as well.
    • Look at the photo for assembling the necklace above right.
      • I turned the canvas edge to the back of the tapestry and glued in place with fabric glue.
      • I sewed two rings onto the upper edge of the tapestry, leaving enough space for the chain to be attached.
      • I cut a piece of cardboard slightly smaller than the tapestry and then covered the cardboard and its edges with black lining and glued it in place. (fabric glue)
      • I then glued the lined cardboard backing to the back of the tapestry. (fabric glue)
      • I attached the chain with pliers and voila! A necklace ready to wear to your next party!

    Go to the ‘CITY MOSAICS’ necklace page to see other ways to wear this abstract necklace!


    ASK THE ZIVA DIVA !


    C’est moi encore!

    QUESTION: I love your Morris piano bench design. It would look perfect on my piano bench, but the size isn’t the same. Would it be a problem to change the size? From Vera, Hamilton, Canada.

    Dear Vera,

    That’s not a problem at all!

    Just send me the dimensions of your piano bench and I’ll adjust the Morris design to suit. If the size isn’t too different from the one you’ve seen on the website, there will be no change in cost!

    Because I’m a needlepoint designer and artisan (and an interior designer), I create and paint each order individually. So a change is size is not a problem.

    Also, a slight change in colours, such as a background colour to match your interiors, is possible.

    My work is not ‘stamped out’ or mass-produced.

    You could also request a Custom Design.

    For example, I’ve just designed a very large Prairie Style seat bench pad for a client (see photo at right).

    I created several designs, got approval for one of them and then painted the canvas. They now have an exclusive design that will become a beautiful family heirloom.


    As they say in France “Tout est possible!” (“Everything is possible!”).

    Contact me soon with the dimensions and we can get started on your project! Thanks again, Vera, for your interest.


    WHAT NEXT?


    Still working on more seat and piano benches, chair pads and footstool designs!

    I’m also still stitching another clutch bag to go with the same easy-to-sew pattern as the ‘Sea Creatures’ clutch bag.

    That should be finished before the next newsletter! Fingers crossed!

    The next VIVA ZIVA! Newsletter #1109 will be issued in May 2011 .

    I’ll be including:

    • New Designs & Updates
    • A new Stitch to Try with a
    • Free needlepoint design of an elegant placemat design complete with a matching coaster design!
    • And lots of other features!

    Please contact me if there is a particular stitch you’d like me to use for a free design in a future newsletter!

    Share this newsletter with friends and relatives.
    They can also go to my subscription page on the site to get on the mailing list for the next VIVA ZIVA! Newsletter

    Looking forward to sending you the next newsletter!

    Sylvia McLeod