| Back to Back Issues Page |
 |
| VIVA ZIVA ! newsletter: Volume # 1415: FREE MONDRIAN STYLE SERVING TRAY DESIGN April 30, 2014 |
|
V I V A Z I V A ! n e w s l e t t e r ▪volume number: 1415 ▪ FREE MONDRIAN STYLE SERVING TRAY DESIGN ▪ Thanks so much for subscribing to the VIVA ZIVA! Newsletter. We’ll be issuing a newsletter regularly, with a new free design each time... exclusively created for this newsletter. NEW DESIGNS JUST RELEASED! We’ve just added 3 MORE ‘MY FRENCH COUNTRY’ DINING CHAIR SEAT COVERS DESIGNS to add to ‘My French Country’ Series... PLUS 5 COLLAR NECKLACE DESIGNS … a new collection from ZIVA VOGUE!
CREATE THIS BOLD, COLOURFUL, MODERN STITCH SAMPLER! It features a variety of TEN stitches including TWO new ones for a cutting edge free design for a contemporary BLACK LACQUER TRAY… Stitches you’ve tried in other newsletters such as Cross Stitch, Scotch Stitch, Brick Stitch, Mosaic Stitch, and Gobelin Stitch are included, PLUS new ones to try called PARISIAN and CASHMERE Stitches. WHAT’S IN EACH VIVA ZIVA! NEWSLETTER?
NEW DESIGNS & UPDATES THREE MORE ‘MY FRENCH COUNTRY’
Thanks for your wonderful response to the original seat cover ORCHARD SERIES designs we released last fall (2013)! As promised, I've just added 3 more designs to MY FRENCH COUNTRY GARDEN SERIES with delicate repeat patterns in different classic styles… spring wisteria, summer hydrangeas and broad arrowhead (above) for the fall! Flowers that are ‘de rigueur’ in the French garden!And I’m not finished! More designs for the Garden Series are in the works! REMEMBER- Custom colours are possible to go with your décor.
NEW COLLAR NECKLACES DESIGNS
OUR FIRST COLLAR NECKLACES DESIGNS HAVE JUST BEEN RELEASED! These voguish collar necklaces’ designs will add a striking touch to whatever you’re wearing! Whether you wear them with your Little Black Dress or something more casual chic and colourful, they will give an exclusive look! Go to our Collar Necklaces page and I’m sure you’ll find a design to suit your style and wardrobe!
ZIVA’S DESIGN UPDATES ZIVA CHARTS We’re specialists in hand-painted needlepoint canvases, BUT we wanted to offer you a choice by providing some of the designs in CHART FORM! WHY? Some of our smaller designs such as small purses, small cases, etc. can be expensive to hand-paint because of the hours still involved. As a response to your requests, we are going to start providing CHARTS … the first charts will be for the COLLAR NECKLACES patterns! They have been designed very precisely for 18 gauge canvas, so we think the chart form suits them very well. All these collar necklaces designs will be available in chart form ONLY on the ZIVA SHOPPPING PAGES by June 2014! Subscribe to our Needlepoint Designs Blog to be sure you don’t miss their release!
ASK THE ZIVA DIVA! Dear Marz, You asked me an important question, but I couldn’t get the email address you provided to work to get back to you! So, if you don’t mind, I’ll answer it here. QUESTION: Re: “…piano bench needlepoint. Can the canvas be provided in 2 or 3 pieces that are stitched together upon completion of the needlepointing? I ask because I think handling the whole bench cover size while needlepointing would not work well for me. Thank you for your help.” Marz, from Canada Dear Marz, Piecing needlepoint sections together after they’ve been stitched is something I try to avoid, whether it’s for piano bench covers, area rugs or any large piece. Here are my reasons why:
BEST SOLUTION? I agree that large projects such as piano bench covers are bulky to stitch and heavy, but using a frame on a floor stand can help to alleviate much of this problem. MY TIP? You have another (rather unorthodox) option. When I stitched my own piano bench, (without a frame), I rolled the canvas I hadn’t stitched yet, and clipped both ends with large plastic paper clips to keep it in place. As I progressed, I rolled the finished tapestry the same way, so I was working on a small portion at one time. This is similar to rolling your piece on a frame, but without the frame! I hope my thoughts help you on making a decision on how you will approach your piano bench cover project. Please let me know how you get on. Regards, Sylvia That’s been my experience with working on large needlepoint projects. JOIN IN THE DISCUSSION! HAVE YOUR SAY! WHAT WORKS FOR YOU WHEN STITCHING LARGE CANAVASES? All these decisions have to be made at the point when you’re starting up a large project. Please add your comments, experiences or tips on the HOW TO START page! We want to hear from you!
YOUR STITCHES TO TRY We’ve created a modern stitch sampler exclusively for our subscribers with a variety of TEN stitches including TWO new ones for a cutting edge free design for a contemporary BLACK LACQUER TRAY. As a true reference sampler, you find some old friends that you learned to stitch from earlier newsletters; such as the, Cross Stitch (newsletter#1006), Scotch Stitch (#1314), Brick Stitch (#1313), Mosaic Stitch (#1108), and Gobelin Stitch (#1007). Go to our newsletter back issues page to refresh your memory about these stitches! And we’ve added two more for you to try…. the Parisian Stitch and the Cashmere Stitch! THE PARISIAN STITCH
THE PARISIAN STITCH This vertical stitch comprises alternating one stitch over 2 threads and one stitch over 4 threads making up horizontal rows that fit together. 
The Double Parisian Stitch (left)is the same idea but alternates with 2 vertical stitches over 2 threads, then 2 vertical stitches over 4 threads.
THE CASHMERE STITCH The Cashmere Stitch, is worked similarly to Tent stitch, working right to left, but is worked as a block of stitches featuring differing lengths. As shown in the chart above, a group of 2 short and 2 long diagonal stitches is worked to form a small rectangle. 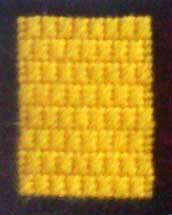 With the stitch sampler design below, depending on the count, a Staggered Cashmere Stitch (right) is used. PRACTICE THESE NEW STITCHES FIRST! Keep practicing following the sequence of stitching in the charts above until you feel confident that you’ve got these new stitches! Then you are ready to stitch the free design.
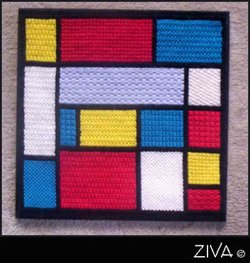
FREE DESIGN ‘GEOMETRIC PRIMARIES’ SERVING TRAY DESIGN 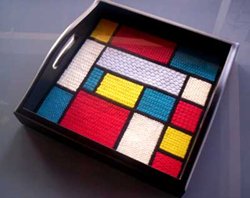
I wanted to create a modern design to incorporate as many stitches from past newsletters as possible for an up-to-date stitch sampler… and, of course, introduce your new stitch to try! INSPIRATION FROM MONDRIAN I looked to the modernist abstract paintings of early 20th century art for my inspiration. Dutch painter, PIET MONDRIAN, created abstracts consisting of a white ground, upon which was painted a grid of vertical and horizontal black lines and the three primary colours of red, yellow and blue. A PERFECT STARTING POINT FOR MY ‘GEOMETRIC PRIMARIES’ DESIGN! THE RESULT? A cutting-edge design adapted from Mondrian’s paintings with a variety of 10 stitches including 2 new ones for a small modern serving tray. To create this contemporary sampler in clean, crisp lines, I limited the selection of most of the stitches to vertical or horizontal ones. If a diagonal stitch was used, I chose only those that created small square or rectangular blocks, like the Cashmere Stitch, Cross Stitch, Mosaic Stitch and Scotch Stitch. I changed the colour of one of the rectangles from white to grey to update the design to fit better into today’s interiors. I also devised that each square or rectangle in the same colour was stitched with a different stitch. For example, with the 4 red rectangles, you’ll see one stitched in the Cross Stitch , one in the Scotch Stitch, one in the Cashmere Stitch, and one in the Double Parisian Stitch. The following is what you need to start stitching this dramatic design… Enjoy! READING THE CHARTS: We normally provide you with a simple grid chart to follow for our free design, but that method won’t work completely when a certain dimension is required. It’s extremely important with this design that your final stitched area is 9.5” square to fit the visible area of the serving tray. NOTE: Interlock canvas is recommended for this design because it is generally more accurate than evenweave when having to meet a certain measurement. However, we all know that needlepoint canvas, even interlock, isn’t always square! Therefore we’re providing you the following charts which show:
It will be up to you to keep an eye on the measurements as you’re setting up and stitching the design on the canvas. If still needed, add more stitches to the outside black border with compensation Tent stitches to be sure the overall dimensions add up to 9.5” square. NOTE THE FOLLOWING:
COLOUR AND STITCH TYPE ALLOCATION CHART
STITCH ALLOCATION CODE 1 = Staggered Cashmere Stitch NOTE: In two of the rectangles in the chart above, we have coded stitches N° 1 (Staggered Cashmere Stitch) or N° 6 (Cashmere Stitch). You can use one or the other depending on your final overall count. This is explained further under section Starting Up and Stitching in Progress below THREAD COUNT CHART
YARN COLOURS All colours for this Stitch Sampler design are chosen from DMC Laine Colbert tapestry wool yarns. I chose these yarns because they are quite thick and cover well, particularly when stitching horizontal or vertical stitches. But you may want to use other fibres like silk, or silk and wool blend. They will work as long as you add enough yarn on your needle to guarantee canvas coverage. Only six colours to consider if choosing another fibre…. the primaries of red, yellow and blue, plus the neutrals of black, white and light cool grey. The following DMC wool yarns are readily available at your local needlepoint shop or online. 6 Laine Colbert yarn colours :
OTHER MATERIALS You will also need :
Go to the ZIVA site for more detail info on the MATERIALS required.
STARTING UP AND STITCHING IN PROGRESS
STARTING UP
IN PROGRESS
MAKING UP SUGGESTIONS Once you’re sure you’ve got the dimensions right, block your stitch sampler to 9.5” square. Follow the instructions from Sudberry House for making up the tray. MAKING UP TIP: Instead fold it back on itself and trim the raw canvas edges to ½” and glue (with fabric glue) or hand-stitch down as flat as possible. Make sure the corners are not too bulky. Double face tape the canvas to the backboard provided. Then assemble as instructed!  You tray is ready for entertaining! Invite a friend over to tea, and have her marvel at your creation!
WHAT NEXT? The next VIVA ZIVA! Newsletter #1416 will be issued in the fall of 2014. I’ll be including:
Please contact me if there is a particular stitch you’d like me to use for a free design in a future newsletter! Share this newsletter with friends and relatives. Looking forward to sending you the next newsletter! Sylvia McLeod |
| Back to Back Issues Page |


