| Back to Back Issues Page |
 |
| VIVA ZIVA ! newsletter: Volume # 1314: FREE 'SCOTS' SCOTCH' HAT BAND DESIGN October 30, 2013 |
|
V I V A Z I V A ! n e w s l e t t e r ▪volume number: 1314 ▪ FREE 'SCOTS' SCOTCH' HAT BAND DESIGN ▪ Thanks so much for subscribing to the VIVA ZIVA! Newsletter. We’ll be issuing a newsletter regularly, with a new free design each time... exclusively created for this newsletter. NEW DESIGNS JUST RELEASED! We’ve just finished creating 'MY FRENCH COUNTRY' DINING CHAIR SEAT COVERS DESIGNS with a contemporary slant on traditional French tapestries! PLUS 8 NEW CUSHION DESIGNS TO ADD TO THE ZIVA CUSHION COLLECTION!
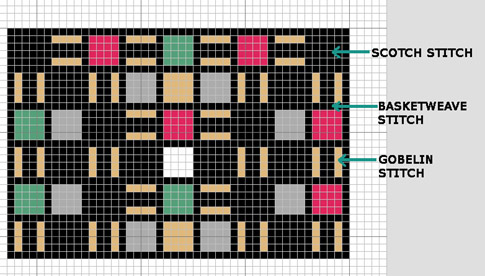
Learn the Scotch Stitch, and stitch this vivid Early-Modernist hat band design (above), “SCOTS’ SCOTCH” inspired by the avant-garde artists and architects, the Glasgow Four! WHAT’S IN EACH VIVA ZIVA! NEWSLETTER?
NEW DESIGNS & UPDATES ‘MY FRENCH COUNTRY’
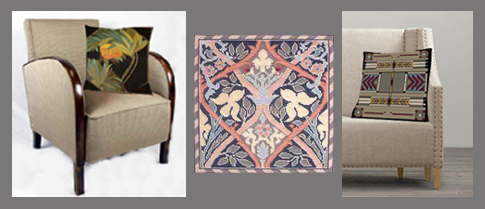
My love of the French countryside, with its vineyards, orchards and gardens inspired me to create SIX NEW STYLIZED CHAIR SEAT COVERS DESIGNS in a ‘floating’ style with classic French flair. I’ll be adding more French Country theme designs for dining chairs, many in an Art Nouveau style, in the coming months! Add an elegant and unique French Country touch to your dining room chairs! NEW CUSHION DESIGNS
EIGHT NEW CUSHION DESIGNS HAVE BEEN ADDED! From Modernist Designs (above left), to Arts and Crafts (above centre) and finally Prairie Style (above right). Go to our Cushions Designs page and have a look! I hope you like them!
ZIVA’S DESIGN UPDATES TESTIMONIALS
Many thanks to Sharon for sending her kind words and photos of her finished “Ginkgo Leaves’ seat bench. It’s beautifully made up and sitting in the foyer of her son’s Prairie Style home. Thanks again for sharing them with us, Sharon! Keep sending photos of your finished Ziva needlework: I’d love to share them with our subscribers.
HAVE YOUR SAY! A NEW FEATURE AT ZIVA! SHARE YOUR NEEDLEPOINT TIPS, TECHNIQUES AND EXPERIENCES AND WE’LL ALL LEARN TOGETHER! Join in and HAVE YOUR SAY ! Add an idea, send a photo!! You have many topics to choose from, such as… your favourite yarns or decorative stitches, your blocking experiences, using a frame or not, your making-up and sewing tips and more! Let’s learn from one another and also help give our fellow stitchers a more pleasurable stitching experience. CAN YOU HELP US NOW WITH THIS BLOCKING QUESTION? I recently received this question: ‘When blocking a rug, what stiffener or sizing do you recommend? Do you have a source to order from? Thanks’ I replied that I had never tried sizing my tapestries, but I had read a recommendation from one source that a stiffening agent can be applied to the back of the canvas as it dries after blocking to help keep it in shape. It's composed largely of starch. However, since I haven’t tried it, I can’t recommend it. If you’ve got any experience or tips about adding sizing to a needlepoint tapestry when blocking it, please add your comments on our BLOCKING PAGE. Thanks so much for your help!
YOUR STITCH TO TRY THE SCOTCH STITCH 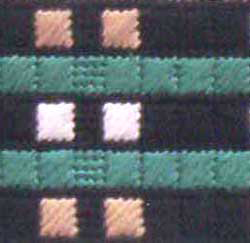
WHY THE SCOTCH STITCH? I needed a stitch to provide large blocks of colour to do justice to the rhythmic squares of MacDonald-Mackintosh’s design. With the bold squares of the Scotch Stitch, I had the means to create the perfect interpretation of the original design. An ideal combination!
The Scotch Stitch is worked similarly to continental stitch, working right to left, but is worked as a block of stitches featuring differing lengths. It can also be worked in differing directions, and is then called the Reversed Scotch Stitch. 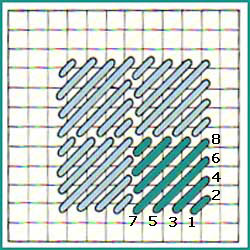
METHOD: Study the chart to the right. Take a piece of scrap canvas and yarn and practice the stitch, following the steps below:
PRACTICE FIRST! Keep practicing until you feel confident that you’ve got it! Then you are ready to stitch the free design. FREE DESIGN ‘SCOTS' SCOTCH’ HAT BAND DESIGN 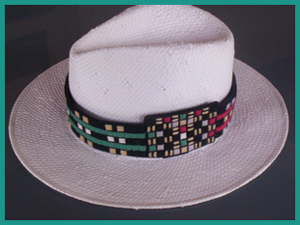
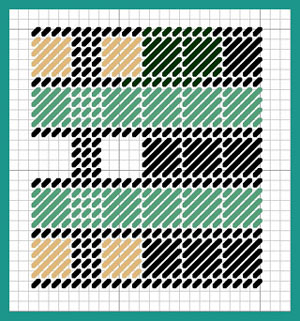
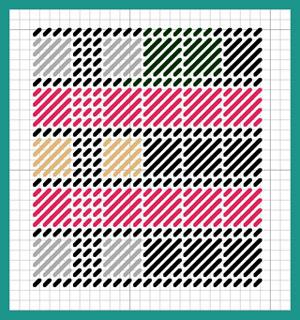
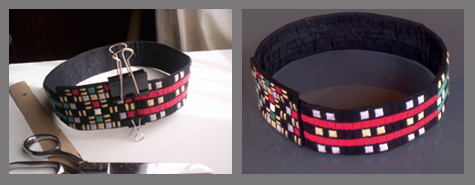
EARLY 20TH CENTURY DESIGN…. Early 20th century artist and textile designer Margaret MacDonald Mackintosh used a series of abstract patterns based on geometric shapes in her textile creations … triangles, grids, squares, and diamonds in vivid colours often set against a grey or black background. INTERPRETED FOR TODAY Her avant-garde designs were a great starting point for creating this contemporary hat band pattern! With the ‘Scots’ Scotch’ design, I incorporated today’s popular hat colours, (white, black and straw colours), into the hat band motif and accented it with alternating horizontal bands of deep red and blue-turquoise…allowing a coordinated fashion effect to suit many hat styles and colours. Other accents colours could be used to match your wardrobe. Several ways to use this design! You could stitch the hat band as shown above… Your choice! Go to the Scotch stitch free designs page for more background on MacDonald’s creations and to see these other making-up ideas. Or why not make up a camera or guitar strap! Or a belt! READING THE CHARTS: TWO CHARTS FOR THE HORIZONTAL BAND NOTE THE FOLLOWING:
CHART #1 BLUE-TURQUOISE BAND MODULE
CHART #2 RED BAND MODULE
CHART # 3 MEDALLION CHART NOTE THE FOLLOWING:
YARN COLOURS All colours for the hat band are chosen from DMC Soft Mat yarns. They are readily available at your local needlepoint shop or online. 6 DMC SOFT MAT yarn colours :
The skein quantities above are based on a medium adult hat size (22” or 56 cm) and stitched as shown in the photo above with the side medallion. OTHER MATERIALS You will also need :
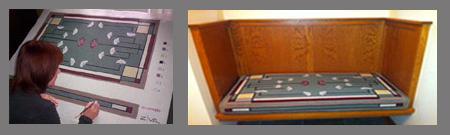
Go to the ZIVA site for more detail info on the MATERIALS required. STITCHING IN PROGRESS
STARTING UP :
IN PROGRESS:
MAKING UP SUGGESTIONS
IT’S READY TO PLACE ON THE HAT!
FINAL TIP! I decided to leave the hat band loose and not to attach it permanently to the hat. ASK THE ZIVA DIVA ! Que moi !
QUESTION: Why does my needlepoint always look like corduroy? Dear Kelly, If you stitch two rows in the same direction next to each other, you will get ridges in your needlepoint. If you use evenweave canvas, you will get better results generally. When you look at the canvas closely, you will see the threads weave over and under each other. With the Basketweave Stitch, you are working your stitching in the same way, and not going against the weave. Not only will you get more even results, there is less distortion as well. Go to our Basic Stitches . page where we show you, complete with charts, ‘how to read’ the canvas to get an even finish. Also, keep an eye on our Needlepoint Tips page, where our visitors have their say. I’ve asked visitors to share their experiences in creating an even finish, and other tips! I hope this helps your stitching results. Regards, Sylvia WHAT NEXT? The next VIVA ZIVA! Newsletter #1415 will be issued in the spring of 2014. I’ll be including:
Please contact me if there is a particular stitch you’d like me to use for a free design in a future newsletter! Share this newsletter with friends and relatives. Looking forward to sending you the next newsletter! Sylvia McLeod |
| Back to Back Issues Page |