|
V I V A Z I V A ! n e w s l e t t e r ▪volume number: 1109▪ FREE PLACEMAT AND COASTER DESIGNS ▪ Thanks so much for subscribing to the VIVA ZIVA! Newsletter. I’ll be issuing a newsletter every three months, with a new free design each time... exclusively created for the newsletter. Learn the Byzantine Stitch and create this ART DECO design ‘DECO BYZANTINE’ for PLACE MAT BORDERS AND A COASTER ready for your next chic luncheon or dinner party!
WHAT’S IN EACH VIVA ZIVA! NEWSLETTER?
NEW DESIGNS & UPDATES TWO MORE CLUTCH BAG DESIGNS ! 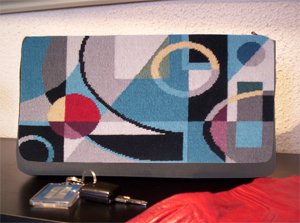
‘Red Planet’ Clutch Bag Flap I used the same purchased pattern I used to make up the clutch bag straps! All you have to do is incorporate the tapestry when you are sewing the clutch bag. It’s that easy! Striking primary colours of cobalt blue, and yellow with an accent of a vivid red globe make up this bold and geometric 1930’s CUBIST design! I’ve also designed a second clutch bag flap design ‘KNIFE THROWER AT THE CIRCUS’ for those who love Matisse’s cut-out designs (like me)! Click here to look at and learn more about these new contemporary needlepoint designs.
NEW FOOTSTOOL DESIGNS ! 
I’d added a new category to the site… NEEDLEPOINT FOOTSTOOLS! First on offer, five classic textile designs from Persia … ideal for creating elegant needlepoint footstools and seat covers. More footstool designs to follow… from Art Nouveau to Abstract! The footstool needlepoint design at right ‘HERIZ-SERAPI’ displays the unique motif from the Heriz region… characterized by cypress trees on a background of terra cotta. It’s a perfect design for an accent piece like this small rectangular needlepoint footstool!
Click here to look at and learn more about these elegant designs that suit both traditional and contemporary homes. SITE UPDATE I would like to update you on a few items: SHOPPING PAGES
ZIVA KITS All the instructions in the kits are automatically in English, unless you specifically ask for them to be in French. SCHEDULING THE NEWSLETTER RELEASES I apologize about the one month delay on releasing this ZIVA Newsletter. You’ve been keeping me busy with painting needlepoint canvases for you! Thanks very much! KEEP ORDERING, I’M LOVING IT! The next newsletter will be in the fall, and I’ll issue a blog over the summer on what I’ll be designing for you for free! Keep checking or sign up for the WHAT’S NEW Blog on the site for news about new designs and the next newsletter release date. YOUR STITCH TO TRY THE BYZANTINE STITCH The 'BYZANTINE STITCH' with its strong zigzag diagonal pattern, creates an ideal Art Deco ‘look’ for 2 needlepoint place mat designs and a matching coaster. I’ve separated the sample charts for the place mat and the coaster so you can practice them separately. The Byzantine Stitch on the coaster is a smaller zigzag than on the place mat, so you should practice them both. THE BYZANTINE STITCH TO TRY FOR THE PLACE MAT 
METHOD: This stitch consists of straight diagonal stitches worked over 3 or 4 thread intersections in a step pattern. Note that the stitch can be worked so the steps and stitches go up to the left or the right. Depending on the design, you can work the stitch over more or fewer threads, and it works well over both even and odd numbers of threads. 
Study the chart to the right. The chart shows the stitch worked over 4 threads in steps of 6 stitches. Be sure that you keep the stitches at the same angle throughout, and follow the numbers on the chart. Experiment on a scrap piece of canvas until you understand the rhythm of the stitch. It stitches very quickly, which is a real bonus! THE BYZANTINE STITCH TO TRY FOR THE COASTER 
METHOD: These ‘BYZANTINE BOXES’ are a variation that combines the Byzantine stitch with the continental tent stitch. Once you’ve practiced the standard Byzantine stitch above, this one will go just as easily. 
Study the chart to the right. I’ve highlighted the Byzantine stitch in red and the filler diagonal stitch in the boxes in yellow.
PRACTICE FIRST! Keep practicing until you feel confident that you’ve got it! Then you are ready to stitch the free design. FREE DESIGNS ‘DECO BYZANTINE’ PLACE MAT DESIGNS
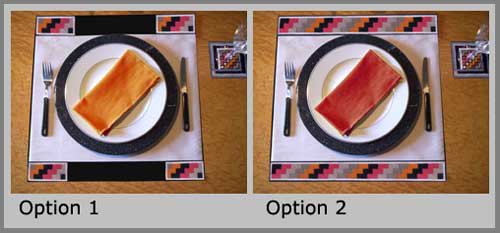
COLOUR OPTIONS For this design, I used colour accents of autumn yellow and terra cotta. But you could try other colour accents depending on your décor! Go to the Byzantine Stitch free designs page for more detail on the design and other colour suggestions. DESIGN OPTIONS I’m providing you with TWO design options for the Place Mat: Option # 1: this design option creates 4 corners of a border for the place mat. Option #2: this design option creates 2 full length horizontal borders for the place mat. READING THE PLACE MAT CHARTS: OPTION #1 CHART
OPTION # 2 CHART
‘DECO BYZANTINE’ COASTER DESIGN 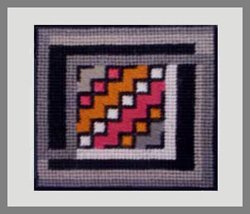
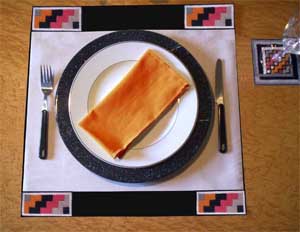
As you can see from the photo at right, the Byzantine Stitch is only used in the centre of the coaster as an accent stitch. The rest of the design is in the tent Basketweave stitch. The overall dimension of the coaster is 4.25” (10.5 cm), perfect for backing it with a 4” x 4” standard cork coaster. See ‘Finishing’ Suggestions below.
READING THE COASTER CHART: Note:The stitch count of the central diagonal squares and the size of the Byzantine stitch zigzags are exactly the same as the one you practiced above! Easy!
YARN COLOURS AND QUANTITIES 1. COLOURS FOR BOTH PLACE MATS AND COASTER APPLETON WOOL TAPESTRY YARNS
All are readily available at your local needlepoint shop or online. 2. QUANTITIES PLACE MATS OPTION #1: 4 skeins of each colour for 4 corners OPTION #2: 1 hank of each colour for 2 border lengths of 18” COASTER
OTHER MATERIALS You will also need :
Go to the ZIVA site for more detail info on the MATERIALS required. STARTING UP
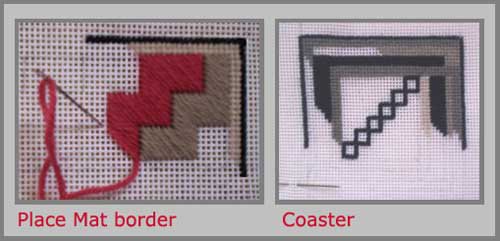
As usual, start by putting masking tape on the canvas edges to protect the yarns from getting frayed. Starting the Place Mat (Photo top left) Whether you’re making just the 4 corners or stitching the full length borders, you start up the same way. Stitch the black and light grey border in the tent stitch as shown, enough to set the dimensions to start the Byzantine Stitch. Then, you’re on your way! You’ll find it goes very quickly Starting the Coaster (Photo top right) Again, use the tent stitch as your outline and start the border in the grey colours. You can see I used the tent stitch as well to establish the interior pattern, by stitching the diagonal boxes first. Then you just have to fill in with the Byzantine stitch. FINISHING THE PLACEMAT AND COASTER THE PLACE MAT After blocking the canvas, you are now ready to finish the placemat!
Option #1: Suggested Finishing
Option #2: Suggested Finishing
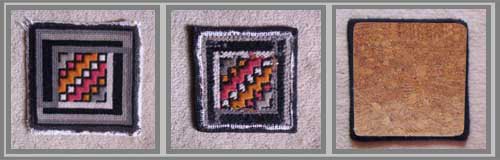
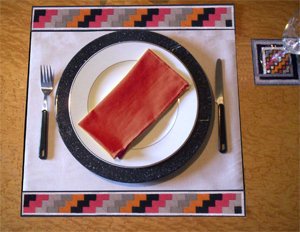
THE COASTER After blocking the canvas, you are now ready to finish the coaster! With reference to the photo above, Here’s what you do:
You’re now ready to set up you table with these dynamic place settings! ASK THE ZIVA DIVA ! Toujours moi! QUESTION: Hello Sylvia, I have decided to purchase the ‘Cat Blues’ Clutch bag.
Dear Julia, MY APOLOGIES! Sometimes PayPal France overrides the English PayPal. To get it into English, please do the following: In your Google window, type in 'Google Toolbar'. It's free to download and installs in seconds; just follow the instructions. It includes Google Translate, which when installed in the language of your choice (e.g.English), will translate any page you want from any language. I took the following off the internet, so you'll see what to look for. Google Toolbar - Take the power of Google with you anywhere on the ... Easily search Google from your browser, translate web pages in more than 40 languages instantly with Google Translate and much more. toolbar.google.com/ After you have installed it, a Translate button will show on your toolbar at the top of your page. You can click this button if your PayPal pages on ZIVA come up in French , and order your canvas in English. It’s that easy! This has no affect on the security of the information you provide. Thank you for your question, Julia. I’m looking forward to painting the ‘Cat Blues’ Clutch Bag canvas for you! WHAT NEXT? Still working on more seat and piano benches, chair pads and contemporary footstool designs! I’m also working on some collar necklace designs! Fun to wear! The next VIVA ZIVA! Newsletter #1110 will be issued in October 2011 . I’ll be including:
Please contact me if there is a particular stitch you’d like me to use for a free design in a future newsletter! Share this newsletter with friends and relatives. Looking forward to sending you the next newsletter! Sylvia McLeod |