|
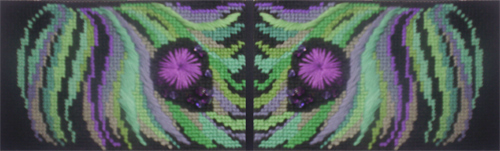
V I V A Z I V A ! n e w s l e t t e r ▪volume number: 1110▪ FREE NEEDLEPOINT BELT DESIGN ▪ Thanks so much for subscribing to the VIVA ZIVA! Newsletter. I’ll be issuing a newsletter regularly, with a new free design each time... exclusively created for this newsletter. Learn the Eyelet Stitch and create this ART NOUVEAU design ‘BLACK NARCISSUS’ :an elegant needlepoint belt to stitch for the holiday season!
WHAT’S IN EACH VIVA ZIVA! NEWSLETTER?
NEW DESIGNS & UPDATES PRAIRIE STYLE SEAT COVERS ,SEAT PADS AND FOOTSTOOLS
These simple dynamic designs, with their natural colours, create striking accents for to-day’s contemporary interiors and furnishings. I’ve created 6 Prairie Style needlepoint seat cover/pad designs for you. Remember, they will also work as piano bench covers! Click here to see how well these uncluttered elegant designs work well with diverse furniture styles. What about using these designs for your favourite footstool? I’ve also I’ve added two striking Prairie Style designs to the ZIVA Footstool Collection… timeless designs from the early 20th century American architectural style. Click here and have a look at these bold geometric footstool designs! SITE UPDATE I would like to update you on a few items: EXCHANGE RATE CONVERTER I’ve added an exchange rate converter to each SHOPPING PAGE for your convenience. You can use it to convert to the currency of your choice. SHOPPING PAGES As a follow up to the last newsletter, I’ve now dedicated a complete page called ”HOW TO VIEW YOUR PAYPAL PAGES IN ENGLISH”. This page will help you enormously when shopping on PayPal. ZIVA’S NEW LOOK! Do you want to see ZIVA’s new designs at a glance? What about checking what the next free design will be? A new RIGHT COLUMN has been added to all the pages giving you an update on all the latest designs! SCHEDULING THE NEWSLETTER RELEASES The date for next newsletter will announced in the NEW YEAR. I’ll issue a blog then on what I’ll be designing for you for free! Keep checking or sign up for the WHAT’S NEW Blog on the site for news about new designs and the next newsletter release date. YOUR STITCH TO TRY THE EYELET STITCH 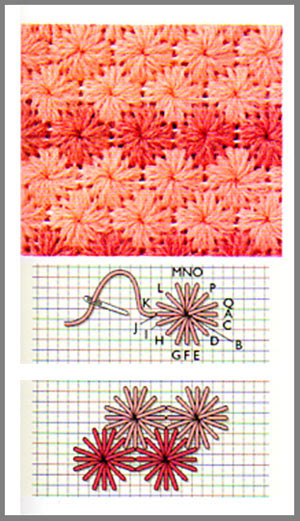
I wanted a burst of colour on the black narcissus bud and the 'EYELET STITCH', works perfectly! For this design, I just needed one circular eyelet stitch, to give this desired effect. However, for other projects, you could make the eyelet stitch in a square or even lozenge shape. METHOD: Study the chart to the right. Take a piece of scrap canvas and yarn and practice the stitch, following the steps below Note: The chart shows the stitch worked over 3 threads.
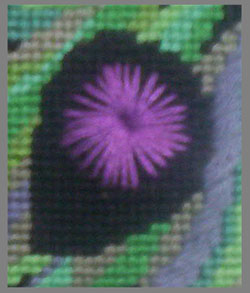
The photo to the right of the black narcissus bud, shows how the eyelet stitch for the belt should look when completed. What are the differences from what you’ve practiced above?
PRACTICE FIRST! Keep practicing until you feel confident that you’ve got it! Then you are ready to stitch the free design. FREE DESIGN ‘BLACK NARCISSUS’ BELT DESIGN 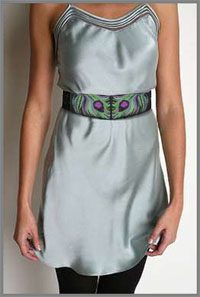
This fluid Art Nouveau belt design of graceful green and turquoise leaves is accented by a bold ‘Black Narcissus’ bud. A selected range of purples completes this harmonious palette. THERE ARE MANY WAYS TO WEAR IT! If you want to stitch it once, this graceful needlepoint belt design is approximately 5” long x 3” high (13 x 7.5 cm). It will work perfectly as a central accent on a belt. If you stitch it twice (as shown in photo to right), with one side mirroring the other, the dimensions for the tapestry part of the belt would be approximately 10.25” x 3” (26 x 7.5 cm). HOW ELSE CAN IT BE EMBELLISHED? Here are some other options for wearing it…….. Give it some glitter for evening wear! Sew on small purple seed-beads in clusters on the black narcissus bud, surrounding the eyelet stitch. You can see this idea on the photo at the top of the newsletter. In addition, to add some depth and more texture to the design, accent some of the leaves in the Gobelin Stitch.How to do this stitch is in the VIVA ZIVA newsletter # 1007. Go to the Free Needlepoint Belt Design page to see photos of all these options!
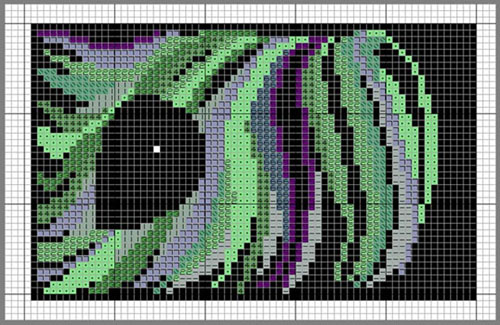
READING THE CHARTS: CHARTS # 1
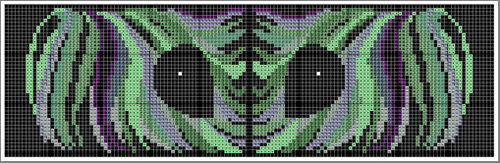
CHART # 2 This chart below shows the same motif in shades of grey, and I’ve highlighted where you could stitch the Gobelin Stitch, if you want to.
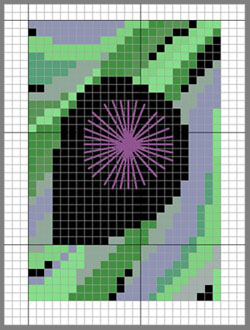
CHART # 3
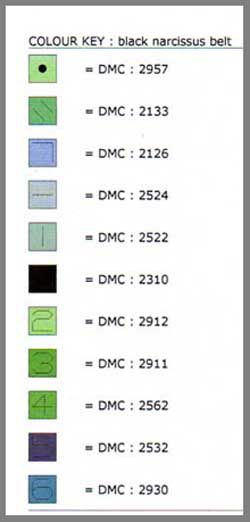
YARN COLOURS All colours are DMC Cotton Yarns from the range of Mat Soft Cotton. They are readily available at your local needlepoint shop or online. To stitch the motif once, you will need two skeins of # 2310 Black and one skein of the remaining colours. To make the longer belt motif, i.e. stitching it twice, double the quantities.
OTHER MATERIALS You will also need :
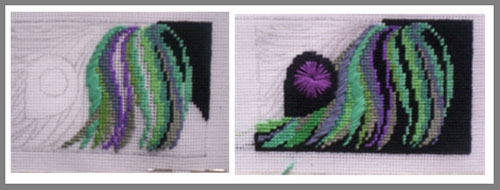
Go to the ZIVA site for more detail info on the MATERIALS required. STITCHING IN PROGRESS
MAKING UP SUGGESTIONS After blocking the canvas, you are now ready to finish the belt! If you’re used to sewing, here’s what you do:
If you’re not a sewer, take these instructions, your tapestry, and your fabric, and have a professional make it up for you. It will be worth it! ASK THE ZIVA DIVA ! Who else! QUESTION: Your instructions in your kit said to mark the canvas shape on a piece of paper, before starting stitching, but I forgot! Now I need to block the canvas, but the shape of the bag is curved. How do I block it, and be sure it’s straight? Cynthia, Minneapolis USA Dear Cynthia, Don’t worry, it’s not too late! I’ve found a way to make sure your curved canvases will block properly. Here’s how: On the back of the stitched canvas, with a WATERPROOF black pen, mark a grid both horizontally and vertically every 3” (8cm) or so all around the stitching. Then go through the same blocking process as you usually do, using the black lines as your guide to be sure the canvas is ‘true’. This system works well. Please send me a photo when it’s made up! WHAT NEXT? In between your orders, I’m stitching some collar necklaces that I’ll introduce to you as soon as I can. I’m trying to finish at least one, so I can wear it during the party season at Christmas! I’m also developing Art Nouveau designs for seat covers. I’ll keep you posted. The next VIVA ZIVA! Newsletter #1211 will be issued in the early spring of 2012 . I’ll be including:
Please contact me if there is a particular stitch you’d like me to use for a free design in a future newsletter! Share this newsletter with friends and relatives. Looking forward to sending you the next newsletter! Sylvia McLeod |