| Back to Back Issues Page |
 |
| VIVA ZIVA ! newsletter: Volume # 1924: FREE ART DECO EVENING BAGS DESIGNS April 28, 2019 |
|
V I V A Z I V A ! n e w s l e t t e r ▪volume number: 1924▪ FREE ART DECO EVENING BAGS DESIGNS ▪ Thanks so much for subscribing to the VIVA ZIVA! Newsletter. We’ll be issuing a newsletter regularly, with a new free design each time... exclusively created for the VIVA ZIVA! newsletter. Over the last months we’ve had the pleasure of painting several Henri Matisse cushion canvases! WHAT JOY! We thought you would like to see these RECENT PAINTINGS…. . ….PLUS…… NEW DESIGNS for A MODERNIST CUSHION DESIGN AND ANOTHER ART NOUVEAU CLUTCH BAG!
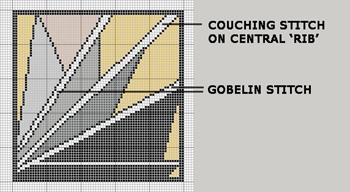
FREE ART DECO EVENING BAG DESIGNS With this one Art Deco design module, we created two exquisite evening bags, called ‘DECO DYNAMICS DUO’ ….. featuring the Couching Stitch’ THIS ONE MODULE CAN GROW! Why not make a larger handbag or even an exquisite ART DECO cushion!
Click here to see our newsletter back issues that may interest you! WHAT’S IN EACH VIVA ZIVA! NEWSLETTER?
NEW DESIGNS & UPDATES NEW MODERNIST CUSHION DESIGN
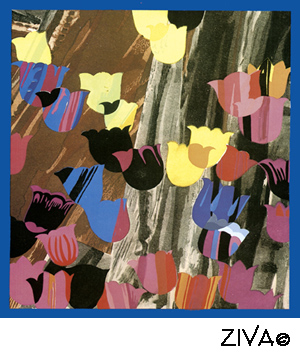
With our new ‘TULIPS IN A SPRING STORM’ design, we’ve created a dynamic contrast of two MODERNIST STYLES! Compare these semi-abstract tulips depicted in a flat graphic manner in a range of colours from pale yellow, rose and corals to blue and black……. to the painterly, textured style of greys and browns which represents the strength and intensity of the spring wind and rain in the background.
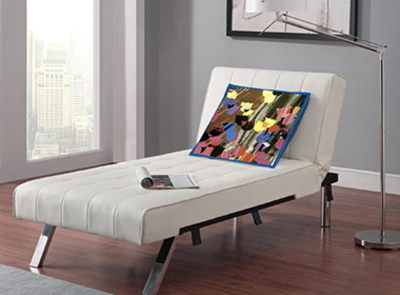
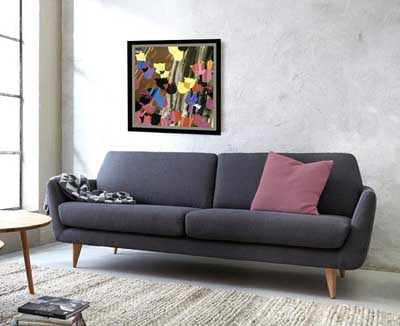
OR ADD A LARGER BORDER AND HANG IT ON THE WALL! STUNNING!
SNEAK PREVIEW! NEW ART NOUVEAU CLUTCH BAG COMING SOON!
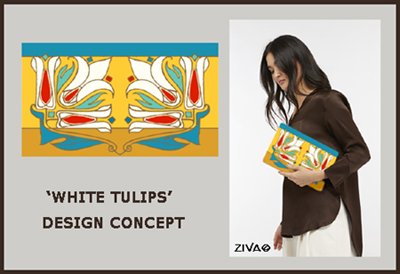
ANOTHER TULIP DESIGN, BUT A COMPLETELY DIFFERENT STYLE! This time we’ve adapted an iconic Art Nouveau motif to create a bright, energetic, contemporary clutch bag design called ‘White Tulips’. The motif is 100% Art Nouveau, and the colours were selected from the classic Art Nouveau palette of gold, mustard, turquoise, duck egg blue, and rusty red. And yet look how perfectly this youthful design works with to-day’s fashion! We’ll be finalizing the details of the design and be putting it on our website SOON. RECENT PAINTINGS We’ve just had a bonanza of painting the joyous designs of Henri Matisse! Starting with……
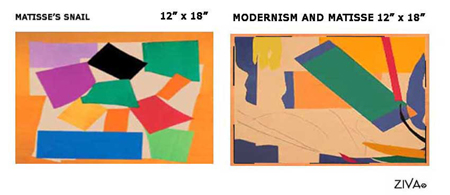
……. MATISSE’S ‘SNAIL’ AND ‘MODERNISM AND MATISSE’ DESIGNS We took our original square patterns at 24” and adapted them to suit our client’s request for rectangular cushion designs at 12” x 18”. A SUCCESSFUL RESULT!
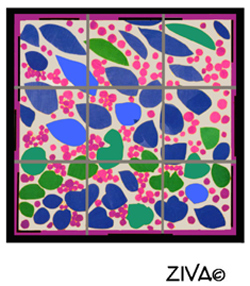
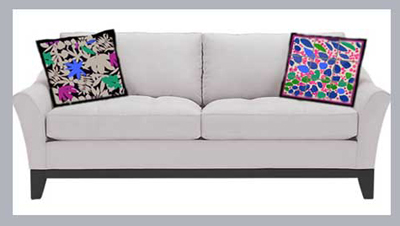
……AND MORE MATISSE! One of our clients wanted two Matisse-inspired cushions for her living room. She loved ‘Les Silhouettes’ motif and the ‘Ivy in Flower’ motif. BUT the colours didn’t quite work well together! Particularly the original yellow background on the Ivy in Flower pattern.
So, we re-worked the colours! The same bright fuchsia, cool green and cobalt blue were used in both patterns, and we introduced new blues and greens plus more black and grey details into the Ivy motif, including a light grey background. A PERFECT RESULT FOR TODAY’S INTERIORS!
YOUR STITCH/TECHNIQUE TO TRY THE COUCHING STITCH 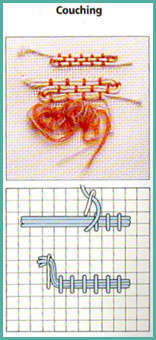
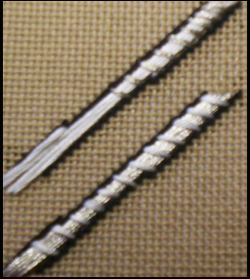
The Couching Stitch is normally used to attach a thread or ribbon that may be too thick or fragile to stitch directly to the canvas. Referring to the image at right:
For this newsletter, we used it as a Feature Stitch for our handbag to create depth and emphasize the ‘ribs’ of the motif. In the top sample stitch in photo to the left, we used a white satin thread to be couched in 3 – 4 rows, then couched it with a silver thread every second row, so the white satin is still visible. With the bottom sample stitch, we reversed the yarns to give a more ‘silver deco look’! Your choice! !
PRACTICE THIS NEW STITCH FIRST! Keep practicing on a piece of 14hpi canvas until you feel you are ready to stitch the free design.
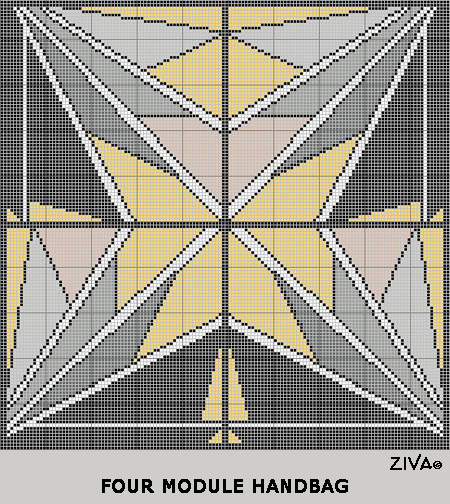
FREE DESIGN 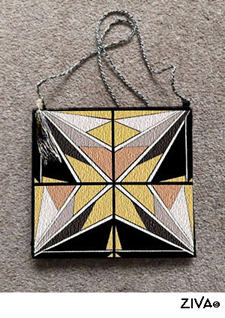 THE DESIGN SHOULDER BAG We turned and flipped the basic Art Deco design module (as shown above) to create four small panels at approximately 10” (25.5 cm) square to form this stylish SHOULDER BAG. Stitch the 4 modules for the front, with a lovely silk fabric for the back or stitch them twice - front and back! Add a satin cord (as shown) or a chain. Très chic!
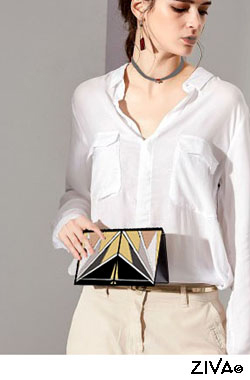
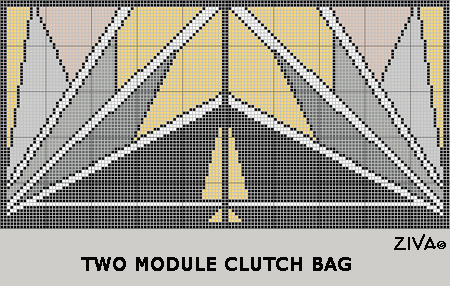
CLUTCH BAG Or do you prefer a CLUTCH BAG for evening wear? With just two mirrored-panel modules at approx. 10” wide by 5” high (25.5 cm x 12.5 cm), this stunning clutch bag is created! You can make it up as a flap or use it as the entire front panel of your clutch bag (as shown).
THE COLOURS To stay pure to the colours of the ART DECO era, we chose a range of neutrals; black, 3 greys, and white. We added a warm palette of soft golden wheat and rose colours, again in keeping with the period. DO YOU WANT MORE ‘BLING’ WITH THE HANDBAG? Why not add silver (on the ribs) and rose metallic threads! Of course, you may have a certain dress or outfit in mind, so you could change the wheat and rose to suit your wardrobe. READING THE CHART: READING THE CHARTS:
STITCHING OPTIONS
FINISHING IDEAS
YARN COLOURS All the yarns for the motifs for the Art Deco bag designs were chosen from DMC Mouliné Spécial (Six Strand Embroidery Floss) and DMC Effect Lumière (Light Effects Floss threads) range of colours. They are readily available at your local needlepoint shop or online.
QUANTITIES As a guide, you will require approximately one skein of the rose and white, two skeins each of the 3 greys and silver, four skeins of the black and gold for each module.
OTHER MATERIALS You will also need :
Go to the ZIVA site for more detail info on the MATERIALS required.
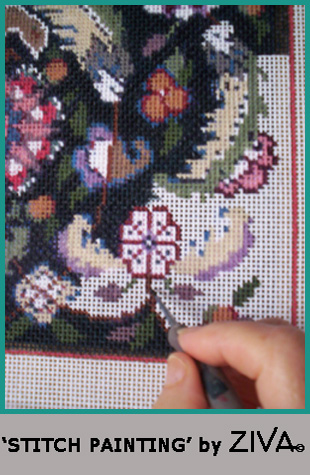
ASK THE ZIVA DIVA! QUESTION: Hi Ziva, I have a lot of ideas for needlepoint for my new home. I really would like to paint the designs myself, but I’ve never done it before, and I don’t know where to start! What do you suggest? Thanks, Vanessa, USAANSWER: Hi Vanessa, Welcome to our world! Once you get into it, you will really enjoy it! The first thing I would do, is look for a local needlepoint store or fabric store that might offer a workshop or course for painting on needlepoint canvas. That’s what I did years ago, because I didn’t like most of the printed kits that were available at the time. With a workshop or course, they can show you how to set up the canvas, transfer your designs onto the canvas, etc. They will also explain which brushes and paint types and paint consistency will work the best. This is especially beneficial if you’ve never painted anything before! If there is nothing locally, you can go through and try the several tutorials available on line. However, I would be cautious and try their various ideas first to see what works for you before starting up your own project. STITCH PAINTING – YES OR NO? If you are just painting projects for your own home, you may not need to delineate each stitch, as you will also be controlling the stitch placement once you’re stitching. However, if you decide to paint projects for others commercially, you would be advised to paint more precisely and depict each stitch, as shown in the image below. (We call it “Stitch Painting”). I hope my advice has been helpful! Just jump in, and soon you’ll be on your way! Regards, Sylvia McLeod
WHAT NEXT? The next VIVA ZIVA! Newsletter #1925 will be issued in the fall of 2019 . I’ll be including:
Please contact me if there is a particular stitch you’d like me to use for a free design in a future newsletter! Share this newsletter with friends and relatives. Looking forward to sending you the next newsletter! Sylvia McLeod |
| Back to Back Issues Page |