|
V I V A Z I V A ! n e w s l e t t e r ▪volume number: 0902▪ F R E E Cell Phone Case Design ▪ Thanks so much for subscribing to the VIVA ZIVA! Newsletter. I’ll be issuing a newsletter every three months, with a new free design each time... exclusively created for the newsletter. WHAT’S IN EACH VIVA ZIVA! NEWSLETTER?
NEW DESIGNS & UPDATES UPDATES FROM THE LAST NEWSLETTER 1. Anatolie Free Bracelet Design I hope you enjoyed stitching the Anatolie Bracelet! I received a suggestion from one of my subscribers who made up the bracelet. She says, “If you sew a small cord in a loop at one end of the bracelet, you can add a decorative button on the other end for a very pretty way of fastening it.” A great idea! Thanks for the suggestion, Carole. 2. Dutch Iris Handbag I hope you’ve had a chance to look at the finished Dutch Iris Handbag on the website. Click here if you want to have a quick look. I’m very pleased with the results! 
As I was stitching the wide back pocket for the handbag, I got really excited with the idea of suggesting it as a small clutch bag as well! It’s just the perfect size! It’s called ‘Iris Buds’. The same design now works two different ways!
NEW DESIGNS - CELL PHONE CASES Two of my handbag designs, Black Chrysler and Cat on the Hot Tin Roof, have back pockets; one for change, keys, etc, and the other for your cell phone. 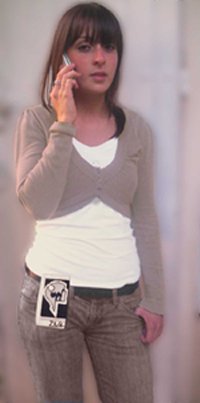
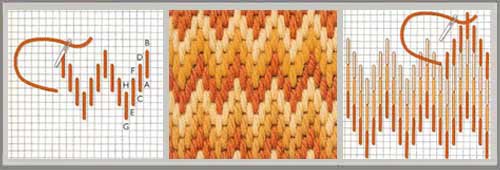
The cell phone pockets also work well as separate cell phone cases! The photo at right shows our model wearing the new cell phone case as a mini-belt bag. Handy for that important call! You can stitch the design and then attach it to your favourite belt. (See sewing tips below) Or you can stitch the same design twice and make it up as a small case for your handbag. I’ll be adding more of these mobile phone case designs to the website soon. If you like the belt bag idea, check out all the larger belt-bag designs on the website. YOUR STITCH TO TRY I’ve chosen the Bargello stitch for Your Stitch to Try this time. It’s a stitch with many names! It’s also known as the Florentine Stitch or the Hungarian stitch. I believe the stitch originated in Hungary during the Middle Ages. It then spread throughout Europe after being used in the 17th century for decorating the Bargello palace in Florence, Italy. It is made up of vertical stitches, set up in a way to form waves or zigzags in gradated tones. (see centre photo below)
It’s easier than it looks!
Now it’s time to try it as I designed it for the Hot Links Cell Phone case… this newsletter’s free design.
PRACTICE FIRST! The photo at right is what you want this new stitch to look like when you’ve finished practicing it. Don’t worry what colours you use at this stage, but make sure the colour in each row is different, so you can see the effect. 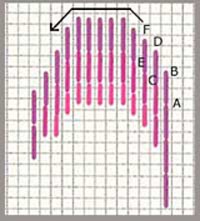
Keep practicing until you feel confident that you’ve got it! Then you are ready to stitch the free design! FREE DESIGN HOT LINKS CELL PHONE CASE DESIGN 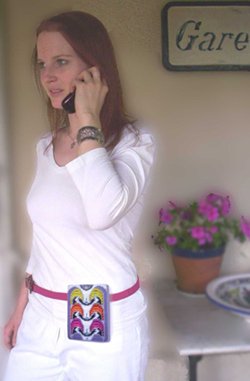
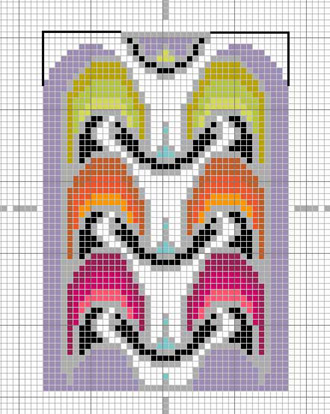
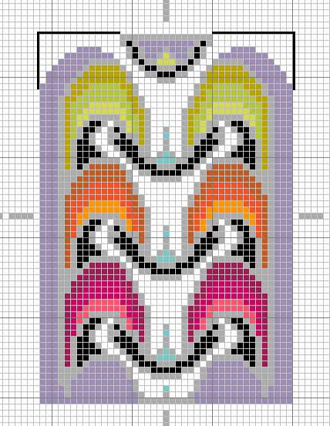
Wear it on your belt or put it in your handbag… either way its sizzling hot colours will set off your summer whites, or complement today’s vibrant colours that everyone loves to wear when it’s hot! The size of the finished needlepoint cell phone case is approx. 3 ½” wide x 5” high (approx. 8.8 cm x 13 cm)… large enough for most cell phones. The cotton yarns for the Bargello stitch are in a range of gradated tones from acidic yellow and yellowy-greens, to vibrant oranges and hot fuchsias! The rest of the case is stitched in the Basketweave Tent stitch, in white, light grey, mauve and black cotton yarn. COLOURED CHARTS I’m including two coloured charts for your reference at different gauges, so you’ll have no trouble getting the canvas in your area. Please note:
This first chart above is for canvas at 12 holes per inch
This second one above is for canvas at 13 holes per inch. YARN COLOURS
All the yarn colours are from the DMC Soft Cotton Colour Range, which are readily available at your local needlepoint shop or online. You will need two skeins each for the white, grey and mauve colours and one skein each for the rest of the colours. Colours as stitched: Colours for BARGELLO stitches: Yellows: from Top to Bottom
Oranges : from Top to Bottom
Fuchsias : from Top to Bottom
BASKETWEAVE stitch in remaining colours:
Go to the ZIVA site for more detail info on the materials required. STITCHING IN PROGRESS 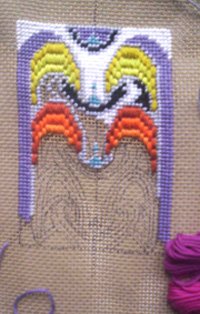
STITCHING TIPS
FINISHING SEWING TIPS The cell phone case was made up in light grey cotton fabric for the backing, with 1” bottom and side panels in the same fabric. But the finishing fabric colour could be bolder! Why not a fuchsia or purple? Any colour from the cell phone case palette will work. For thinner cell phones, you might consider a knife edge finish, instead of the 1” panels. To wear the case as a Mini-Belt Bag
As a cell phone case for your handbag:
Go to the ZIVA website for more tips on sewing needlepoint GREAT TIP! Add a border in one of the colours to create a larger case for your glasses if you prefer!! Use your imagination and make it your own creation!
Send me a photo of what you’ve done. I’d love to see it and put it on the site! ASK THE ZIVA DIVA ! That’s still me! I’ve been asked this question several times: Do you include the yarns with your painted canvas?When I create my needlepoint designs, I have certain yarn colours in mind. I always include a list of these colours with their quantities with your hand painted canvas. This allows you to find the best price for yarn possible, whether it’s from suppliers on-line who ship world-wide or from your local needlepoint shop. As a designer, I’d rather remain independent and work with the right yarns for the right project for my client, and not be tied down to one manufacturer. Also, you may prefer a certain yarn manufacturer, so I’d rather develop the colours to suit your yarn preference. WHAT NEXT? New designs in the works! New belt, piano bench and seat cover designs will be on the site in the next few months!The next VIVA ZIVA! Newsletter #0903 will be issued in October 2009 . I’ll be including:
|